
Quick Starts
These Quick Starts are simple guides to get you familiar with using the app and recording your work, or viewing your employees or students work.
Use the content page to find full tutorials for all the features of App-Rentice
Use the content page to find full tutorials for all the features of App-Rentice
Student Quick Start
The Quick Start guide helps you jump straight into the app and begin creating and viewing entries. For a full walkthrough of all features, check out the Students section.
Access the App
- Search ‘App-Rentice’ in the app stores or
- Download the iOS app at https://itunes.apple.com/nz/app/app-rentice/id1234156125?mt=8
- Download the Android app at https://play.google.com/store/apps/details?id=com.artisanideas.apprentice&hl=en
- You can access the web app at https://app-rentice.firebaseapp.com
1.0
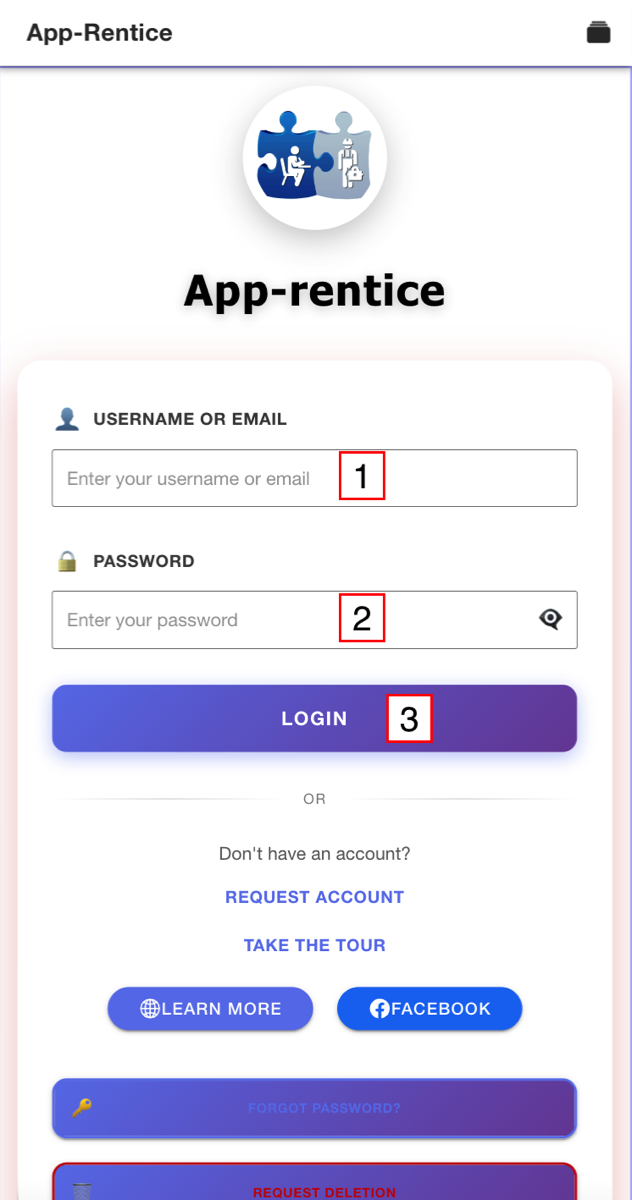
Access the App
It is recommended your try the app with the temp password given to you by your provider, then use the ‘Forgot Password’ function to set your own password.
- Enter your Username or Email
- Enter your Password
- Select Login
It is recommended your try the app with the temp password given to you by your provider, then use the ‘Forgot Password’ function to set your own password.
1.1
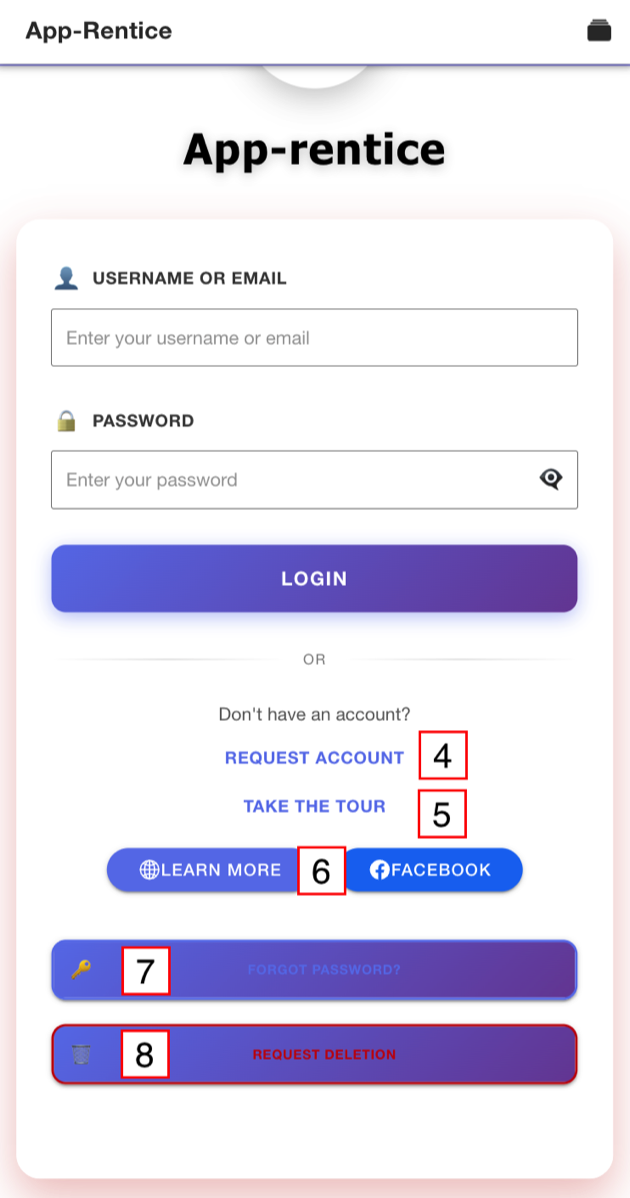
Non-Logged in Content
- Request an Account not applicable for tutor/Assessors
- Take the Tour a view only demo of the student account with pop up descriptions of the features, a tutor/assessor version is coming
- Web Link - find out more info about App-Rentice
- Forgot Password - reset you password
- Request Deletion - Apple Store requirement, not applicable for tutor/assessor accounts as this is managed at an admin level
2.0
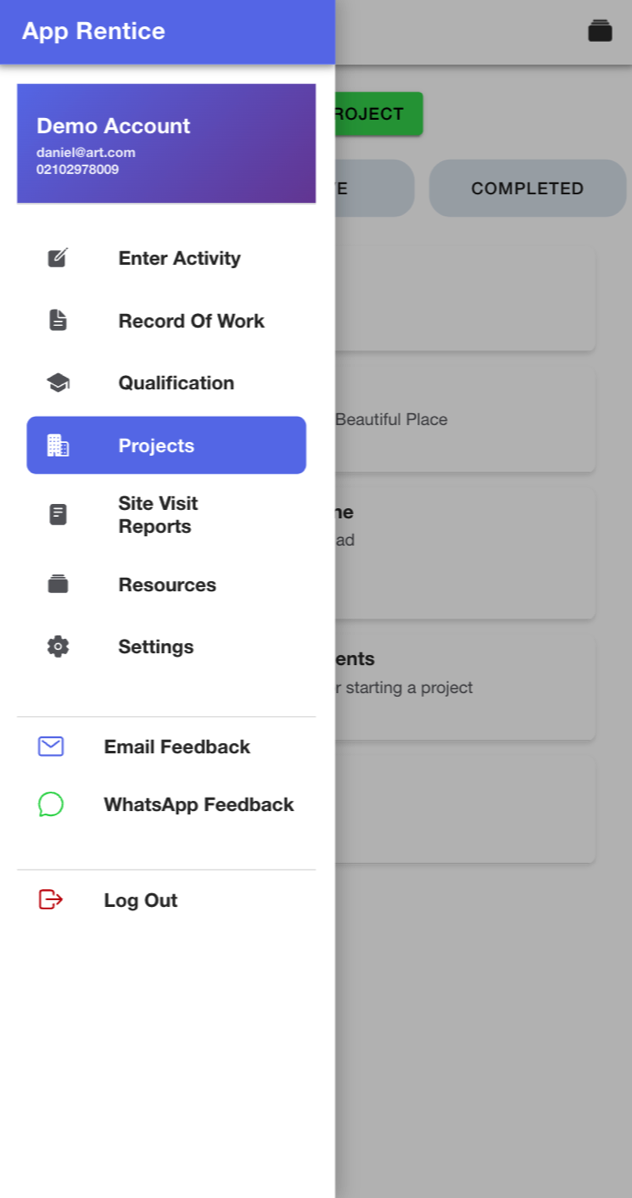
Add Your Projects
Although there are default projects, it is recommended you enter your projects into the app, you can add the later and edit the entry if you forget.
1. Select the side menu
2. Then Select Projects
On the Project Page Select New Project
Although there are default projects, it is recommended you enter your projects into the app, you can add the later and edit the entry if you forget.
1. Select the side menu
2. Then Select Projects
On the Project Page Select New Project
2.1
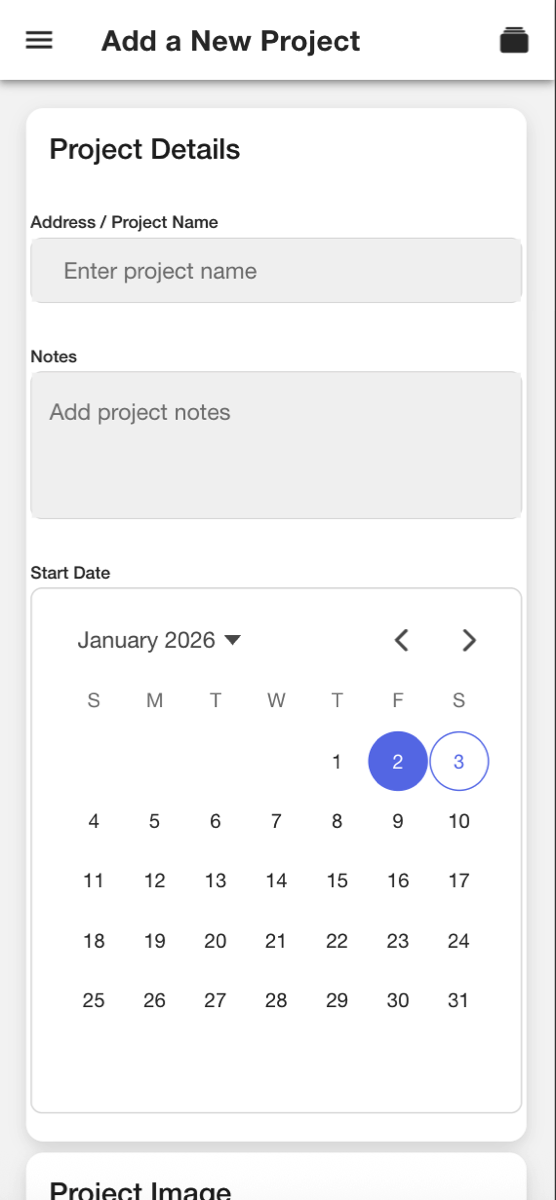
- Select New Project
- Enter the project name
- Add notes if needed (optional)
- Add a start date (optional)
- Add a photo from your camera or photo folder (optional)
- Select Save Project
Repeat for all your projects or select the side menu to exit.
Entering an Activity
3.0
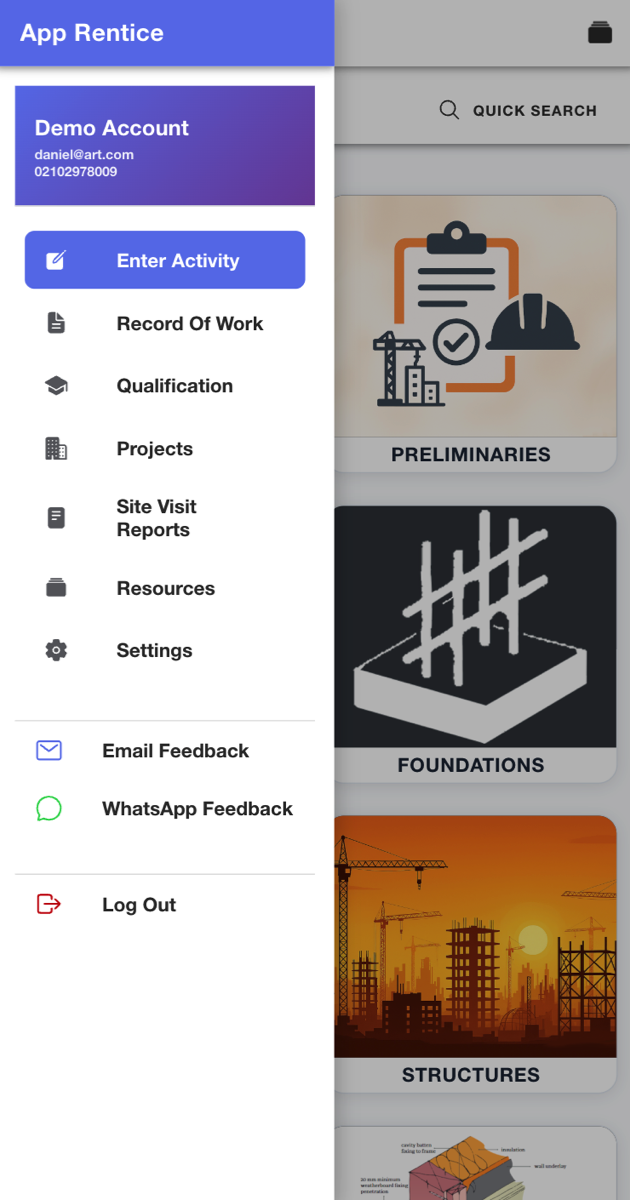
Enter Activity
Select ‘Enter Activity’ from the side menu
Select ‘Enter Activity’ from the side menu
3.1
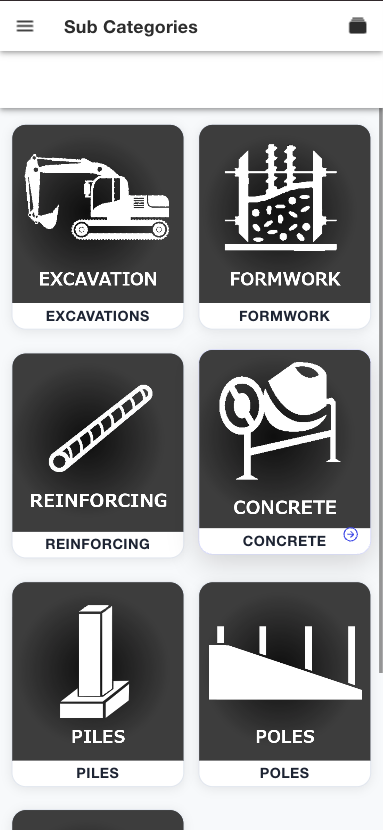
- Select your main category from the list or menu
- Swipe up and down to scroll
- Select your sub category from the list of menu
Depending on your provider, the Category pages will be displayed as either a list or a menu screen with image icons
3.2
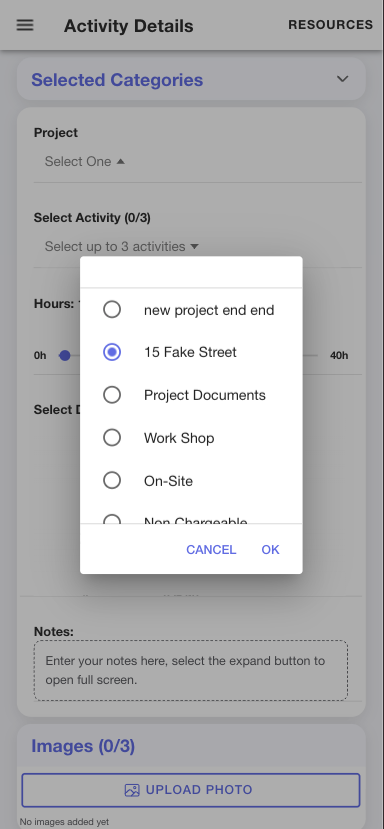
Select a Project
If you forgot to add your project, just select one of the defaults and continue, see 2.0 to add your Project and Edit the entry to add it.
- Select the Project Dropdown
- Select your project
- Swipe up and down to scroll
- Select ‘OK’
If you forgot to add your project, just select one of the defaults and continue, see 2.0 to add your Project and Edit the entry to add it.
3.3
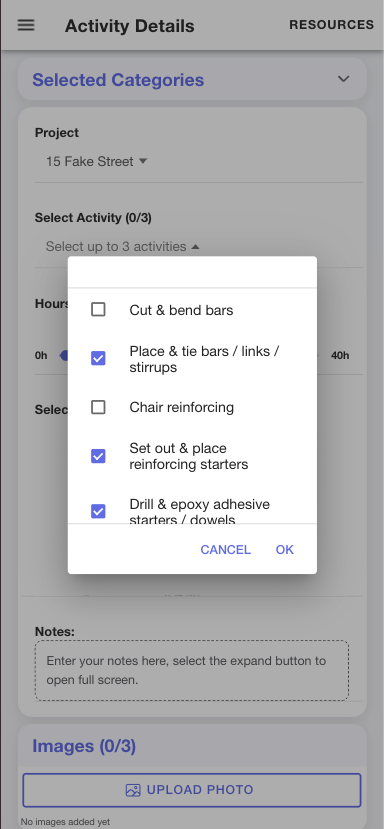
Select your Activities
App-Rentice uses a three level Work Breakdown Structure (WBS), if your course only has two levels an ‘Activity Completed’ placeholder will be preselected
- Select the ‘Select Activity’ Dropdown - Max 3
- Select the tick box
- Select ‘OK’
App-Rentice uses a three level Work Breakdown Structure (WBS), if your course only has two levels an ‘Activity Completed’ placeholder will be preselected
3.4
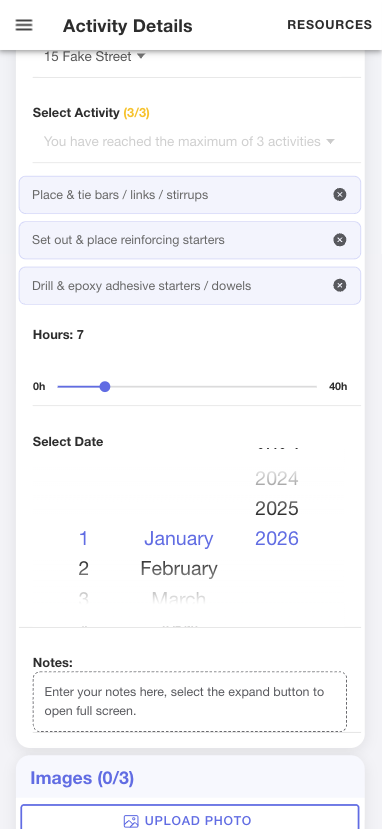
Add Hours and the Date
App-Rentice has a limit of 40 hours per entry as it’s designed to create individual entries for each activity, or group of similar activities so they can be easily searched later.
There’s a save and enter another feature to help quickly enter many activities.
- Use the slider to select how many hours
- Select the date to change, it will be today’s date by default.
- Select ‘Cancel’ to close the date selector or ‘Done’ to choose the new date and close.
App-Rentice has a limit of 40 hours per entry as it’s designed to create individual entries for each activity, or group of similar activities so they can be easily searched later.
There’s a save and enter another feature to help quickly enter many activities.
3.5
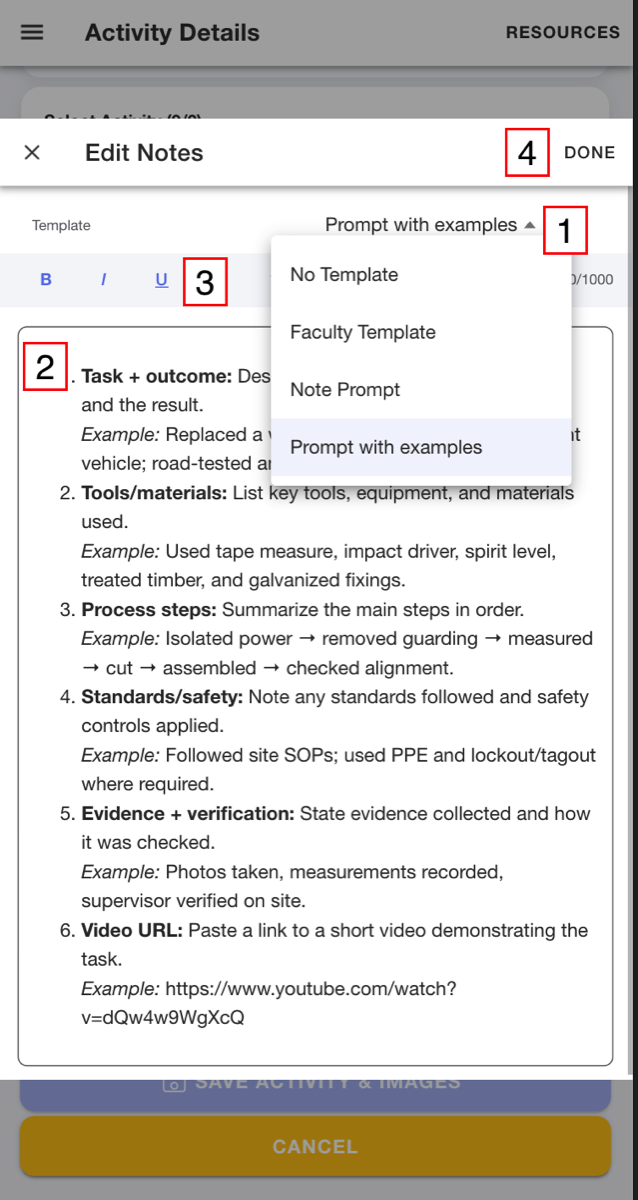
Notes (Optional)
Select the Notes box to open the full screen modal
Select the Notes box to open the full screen modal
- Templated Text is available, there's an App-Rentice Default, Default with Examples and a Template created by your Training Provider
- Text box allows up to 1000 characters
- Text Rich Options
- Select Done to close
3.6
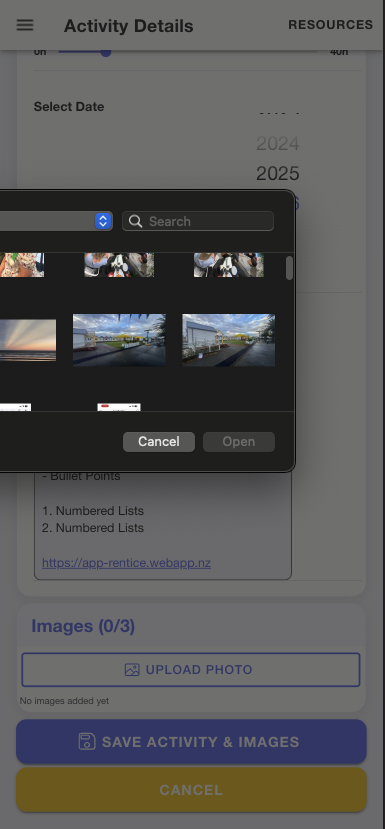
Add Photos
- Select Upload Photo
- Select the devices camera or photo folder from the pop up
- Take or select your photo
- Repeat to add more photos - Max 3
3.7
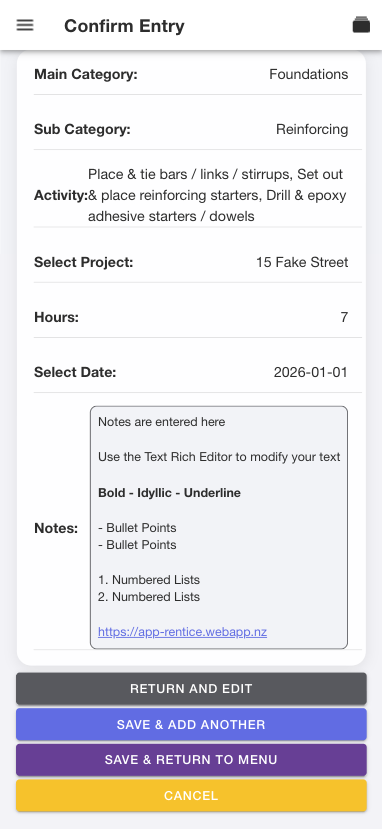
Save / Confirm / Edit / Enter Another
Select Save Activity and Images
The Confirm Entry will allow you to check your entry details again, as well as give you the option to make another entry with similar details
By selecting ‘Save & Enter Another’ the entry will be saved and then an ‘Another Entry’ Screen will open with the same details, allowing you quickly make another entry by changing any details if needed and/or taking more photo’s, then selecting save.
Selecting ‘Save and Return to Menu’ will save the entry and take you back to the start menu.
Select Save Activity and Images
The Confirm Entry will allow you to check your entry details again, as well as give you the option to make another entry with similar details
By selecting ‘Save & Enter Another’ the entry will be saved and then an ‘Another Entry’ Screen will open with the same details, allowing you quickly make another entry by changing any details if needed and/or taking more photo’s, then selecting save.
Selecting ‘Save and Return to Menu’ will save the entry and take you back to the start menu.
View Your Entries
4.0
Record of Work
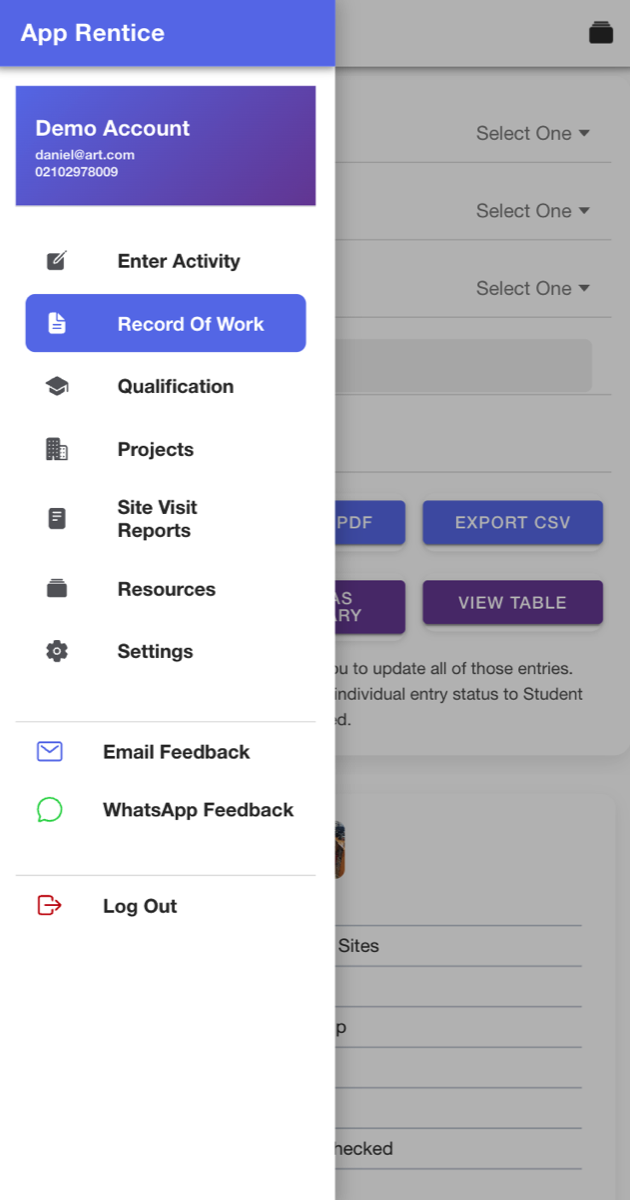
Select ‘Record of Work’ from the side menu
Select ‘Record of Work’ from the side menu
4.1
Record of Work
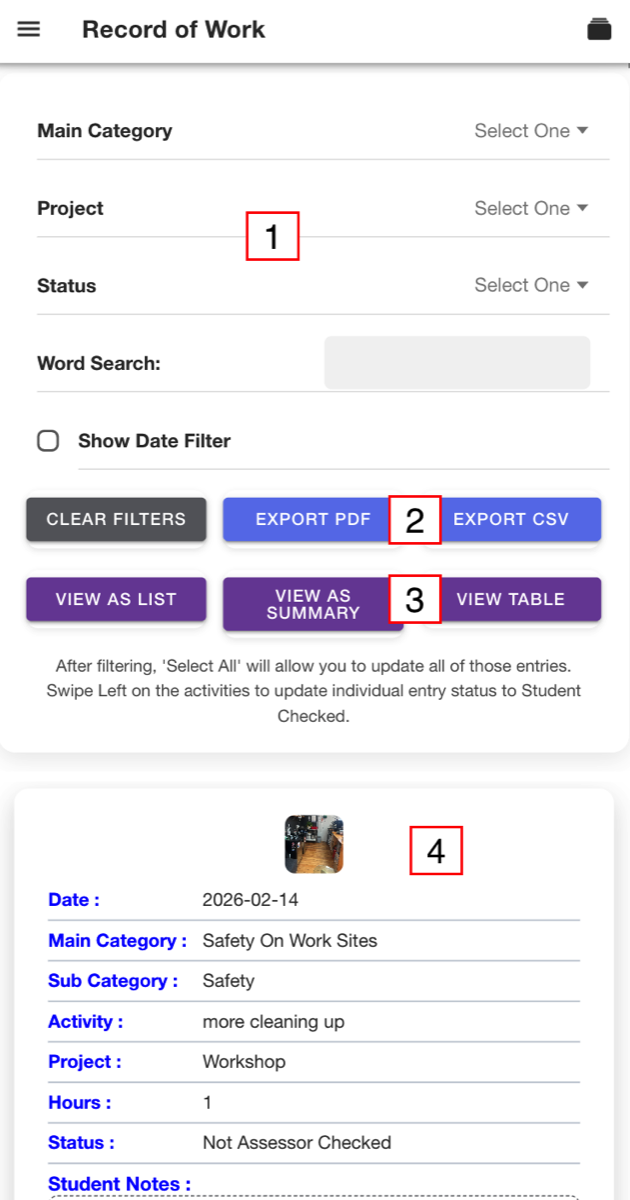
The Record of Work displays all completed entries with the ability to filter the list and change the way you view them.
The Record of Work displays all completed entries with the ability to filter the list and change the way you view them.
- Filter the Categories
- Export to PDF or CSV
- View as List, Summary, or Table
- Entries List
4.2
Filter Options
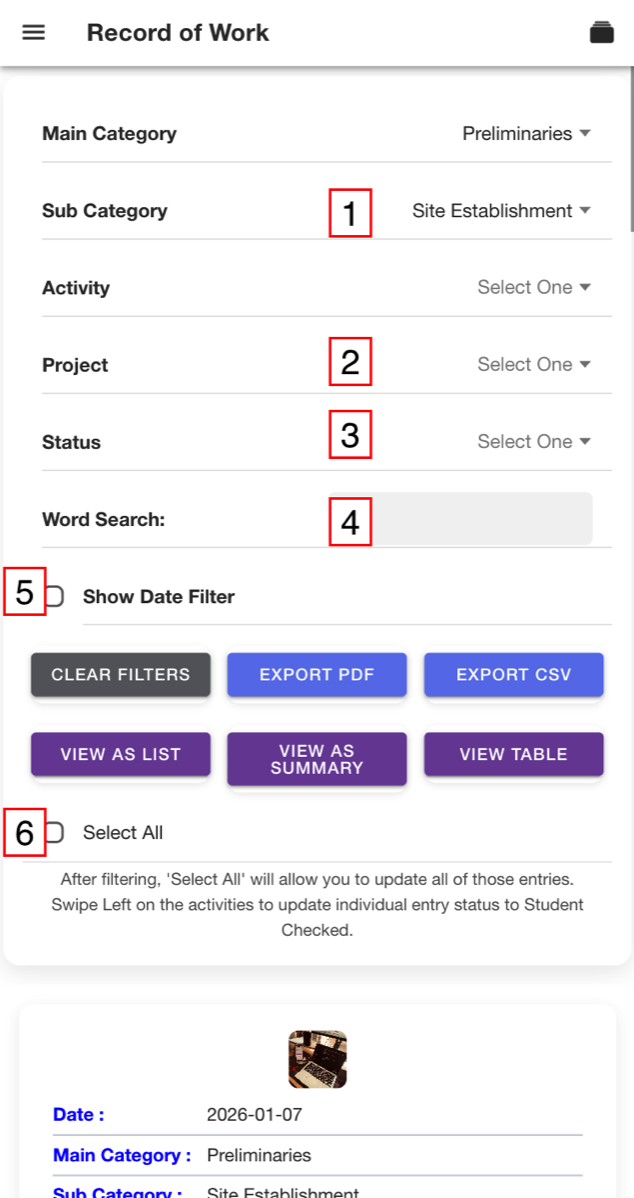
Making a selection will automatically update the list.
Select the Clear Filters button to reset the filter
Making a selection will automatically update the list.
- Selecting a Main Category will then display the dropdown for its subcategories, Selecting a Sub Category will then display its Activities.
- Filter by Project
- Selecting a Status from the dropdown will filter the list by status
- You can filter the list by entering specific text in the Word Search
- Selecting the Show Date Filter Checkbox displays the from and to dates
- When the entries are filtered you are able to Select All to, update those entries statuses to 'Student Checked'
Select the Clear Filters button to reset the filter
4.3
Display and Export Options
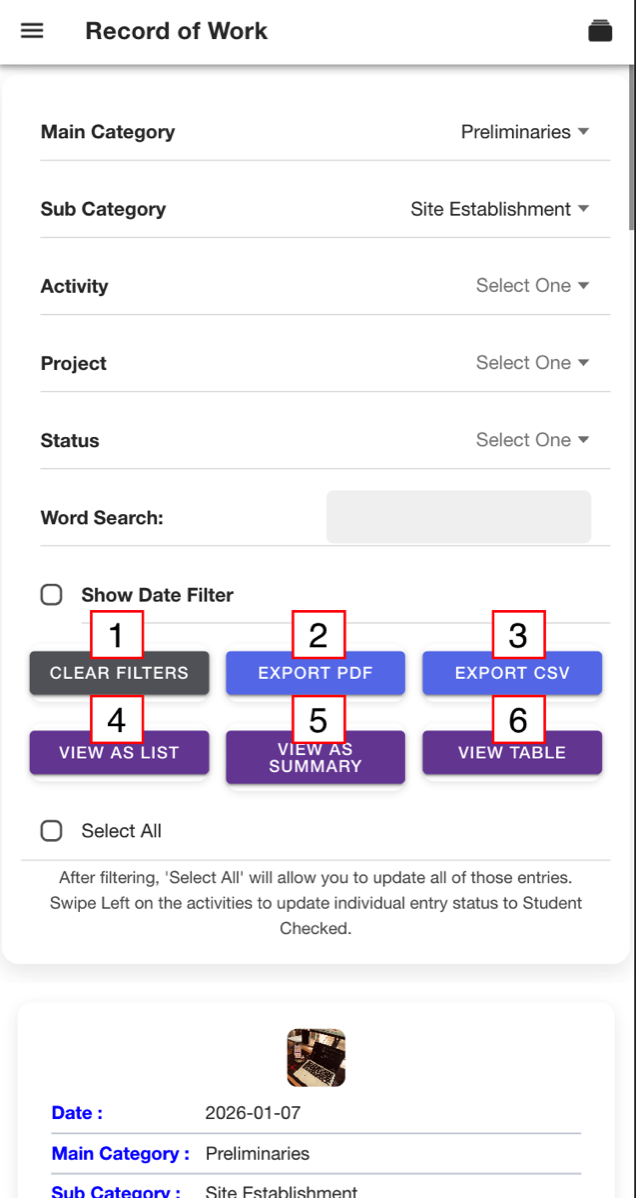
You can use the filter and then swap between list and summary views
PDF Export will not 'print all' you will need to scroll down the list to include them in the PDF
- Clear Filter resets the list
- Export PDF creates a PDF of the table view using the filters and the displayed entries.
- Export CSV creates a CSV file with all or the filter entries
- Default view is the View as List
- View as Summary views show the categories with total hours completed, selecting a category will open the sub categories and the activities.
- View Table show the entries with the details in a row
You can use the filter and then swap between list and summary views
PDF Export will not 'print all' you will need to scroll down the list to include them in the PDF
4.4
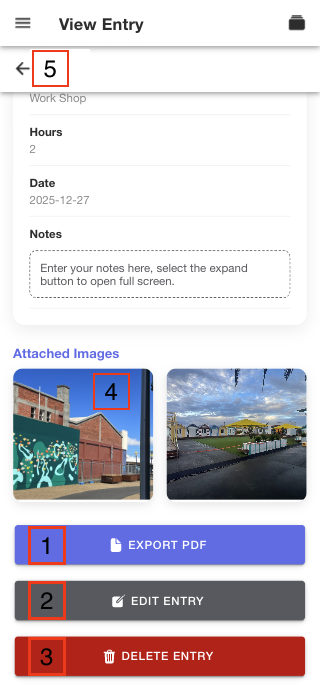
View Entry
Tap an entry to open it
All the entry information and saved images are displayed on this page, including if the Tutor/Assessor has made any notes
Tap an entry to open it
All the entry information and saved images are displayed on this page, including if the Tutor/Assessor has made any notes
- Export PDF create a PDF of that entry
- Edit Entry opens the entry allowing you to edit the details, see Making an Entry for info
- Delete Entry, you'll be prompted to confirm
- Tapping on the image will open it allowing you to download it
- The Back Arrow will take you back to the previous page
Tutor / Assessor Quick Start
The Quick Start guide helps you jump straight into the app and begin viewing student entries. For a full walkthrough of all features, check out the Tutors and Assessors section.
Access the App
- Search ‘App-Rentice’ in the app stores or
- Download the iOS app at https://itunes.apple.com/nz/app/app-rentice/id1234156125?mt=8
- Download the Android app at https://play.google.com/store/apps/details?id=com.artisanideas.apprentice&hl=en
- You can access the web app at https://app-rentice.firebaseapp.com
1.0
Access the App
It is recommended your try the app with the temp password given to you by your provider, then use the ‘Forgot Password’ function to set your own password.
- Enter your Username or Email
- Enter your Password
- Select Login
It is recommended your try the app with the temp password given to you by your provider, then use the ‘Forgot Password’ function to set your own password.
1.1
Non-Logged in Content
- Request an Account not applicable for tutor/Assessors
- Take the Tour a view only demo of the student account with pop up descriptions of the features, a tutor/assessor version is coming
- Web Link - find out more info about App-Rentice
- Forgot Password - reset you password
- Request Deletion - Apple Store requirement, not applicable for tutor/assessor accounts as this is managed at an admin level
2.0
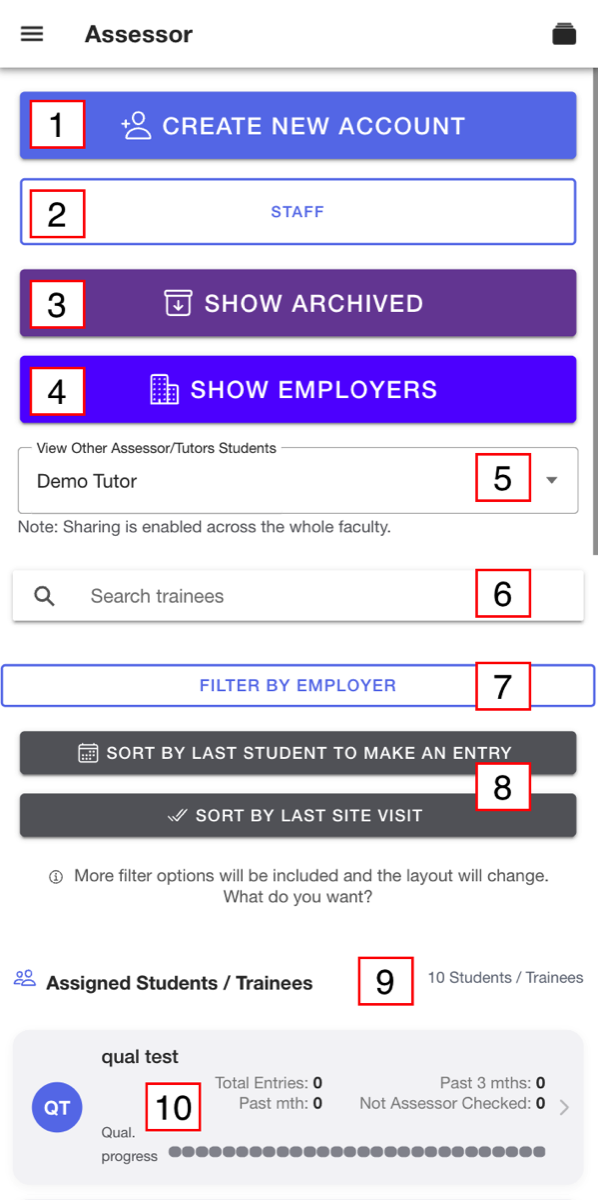
Assessor Menu
When in you log in with an Assessor/Tutor Account it should automatically load the Assessor Menu, otherwise select it from the Side Menu
- Create New Account Student or Employer
- Staff if your faculty allows sharing, you can edit other tutor account details
- Show Archived - change the student list to the accounts that have been archived
- Show Employers - change the list to show the employers linked to your students
- View other Tutors Students - if your faculty allows sharing, you can select another tutor to view their students.
- Text Search - enter the first / last / part of a name
- Filter by Employer - select an employer to view all the students linked to them
- Student/Employer Count -
- Student Card - each of your students is displayed with stats on the entries they have made and qualification progress
When in you log in with an Assessor/Tutor Account it should automatically load the Assessor Menu, otherwise select it from the Side Menu
2.1
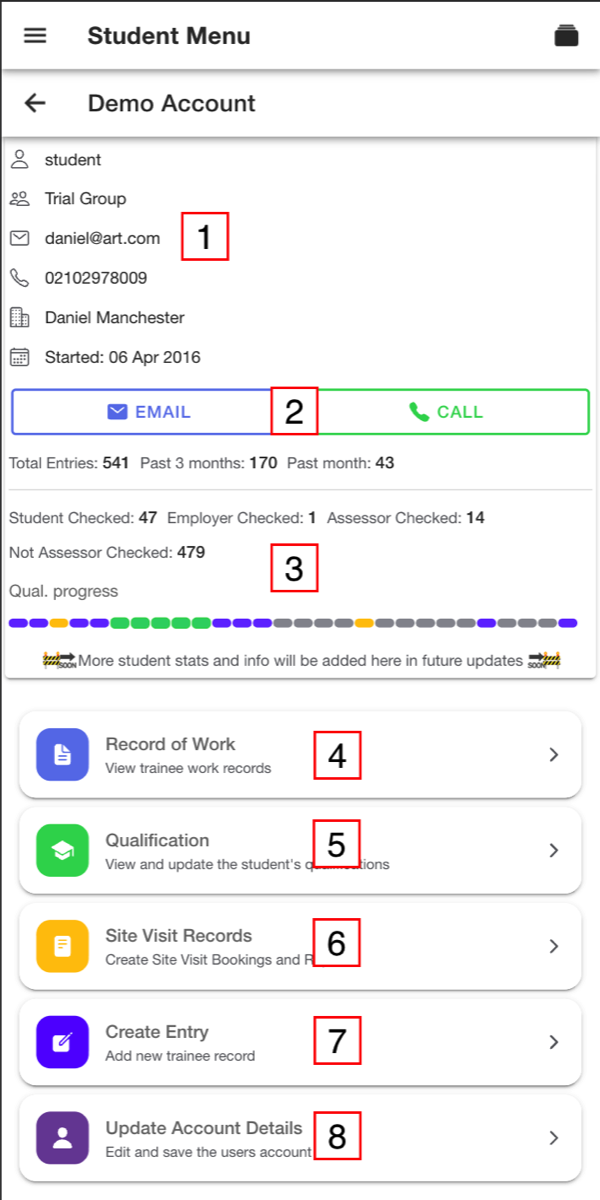
View Student / Trainee Menu
This page displays all the information and options associated with the student
This page displays all the information and options associated with the student
- Students Info
- Email / Call buttons
- Student Stats
- Record of Work
- Qualifications
- Sign Offs / Site Visits
- Create Entry
- Update Account Details

View the Student's Log / Record of Work
When viewed on a wider screen like a tablet or computer, the Entry info will changed to two columns
3.0
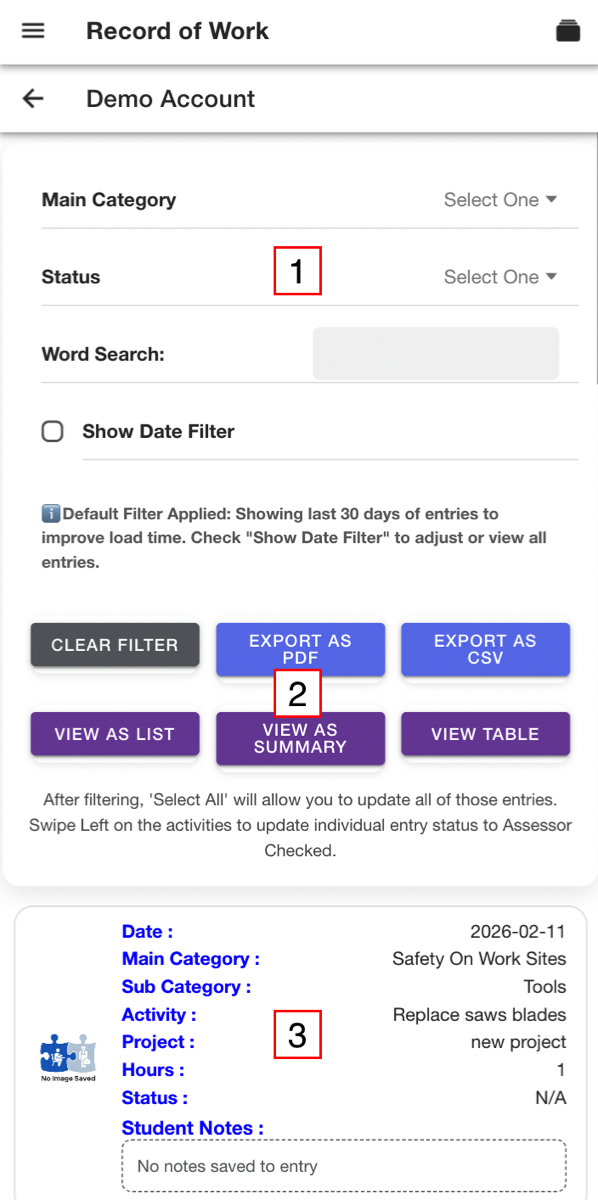
Record of Work
The Record of Work displays all completed entries with the ability to filter the list and change the way you view them.
The Record of Work displays all completed entries with the ability to filter the list and change the way you view them.
- Filter the Categories
- Different Views and Exports
- Entries List
3.1
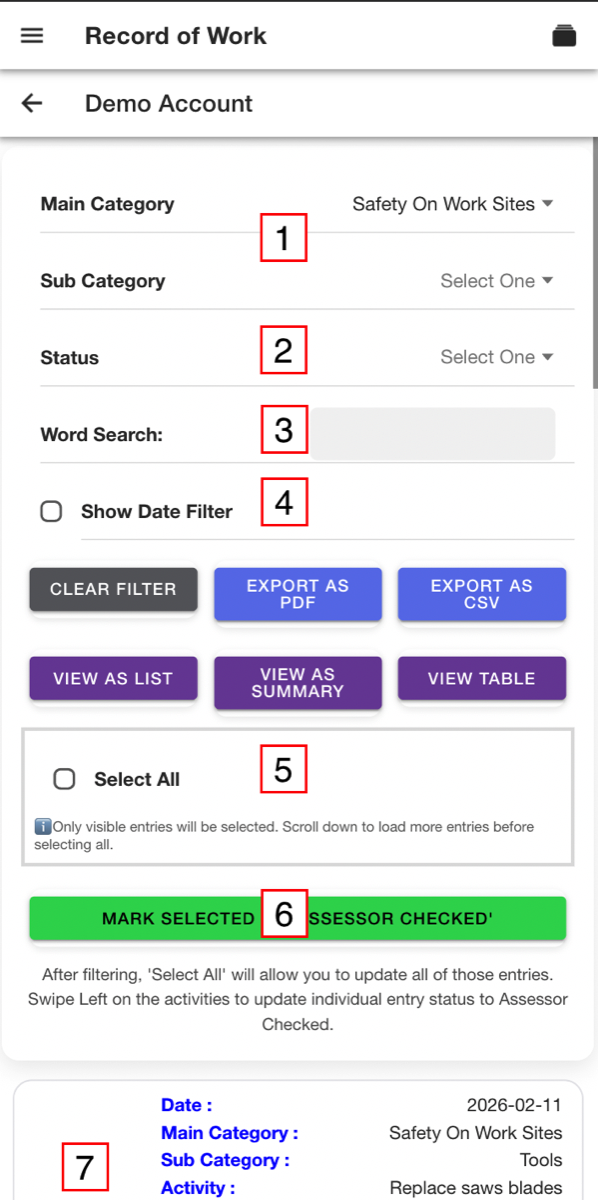
Filter Options
Making a selection will automatically update the list.
Select the Clear Filters button to reset the filter
Making a selection will automatically update the list.
- Selecting a Main Category will then display the dropdown for its subcategories, Selecting a Sub Category will then display its Activities.
- Selecting a Status from the dropdown will filter the list by status
- You can filter the list by entering specific text in the Word Search
- Selecting the Show Date Filter Checkbox displays the from and to dates
- When the entries are filtered you are able to Select All to,
- Mark Selected as 'Assessor Checked' this will update the status of selected entries.
- When filtered, each entry will have a checkbox that can be selected/unselected when marking as assessor checked.
Select the Clear Filters button to reset the filter
3.2
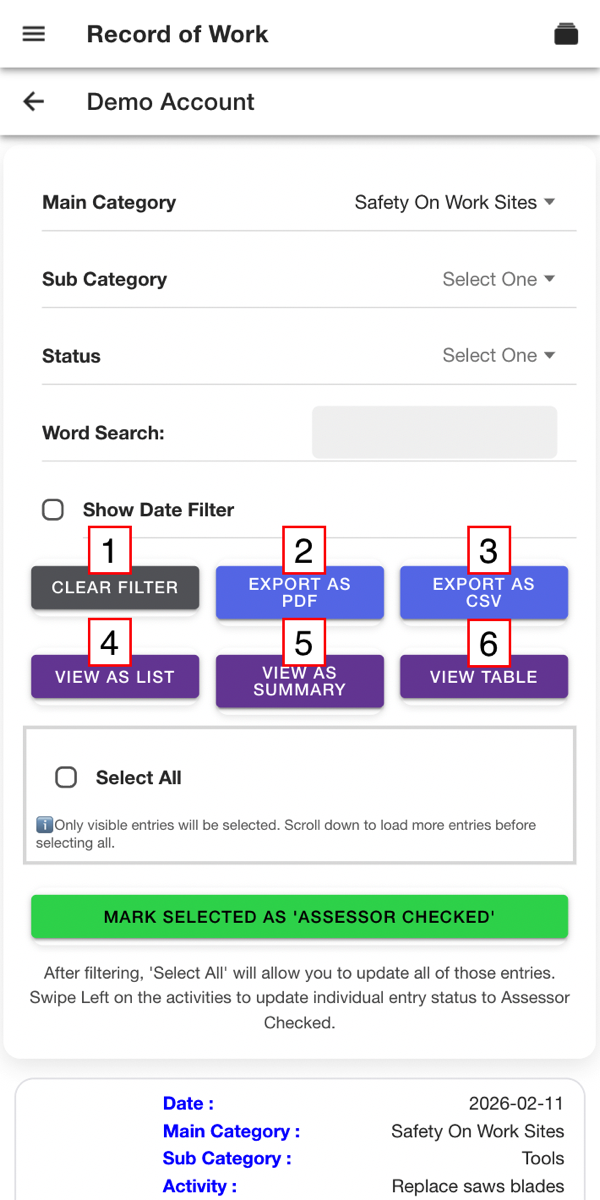
Display and Export Options
You can use the filter and then swap between list and summary views
PDF Export will not 'print all' you will need to scroll down the list to include them in the PDF
- Clear Filter resets the list
- Export PDF creates a PDF of the table view using the filters and the displayed entries.
- Export CSV creates a CSV file with all or the filter entries
- Default view is the View as List
- View as Summary views show the categories with total hours completed, selecting a category will open the sub categories and the activities.
- View Table show the entries with the details in a row
You can use the filter and then swap between list and summary views
PDF Export will not 'print all' you will need to scroll down the list to include them in the PDF
3.3
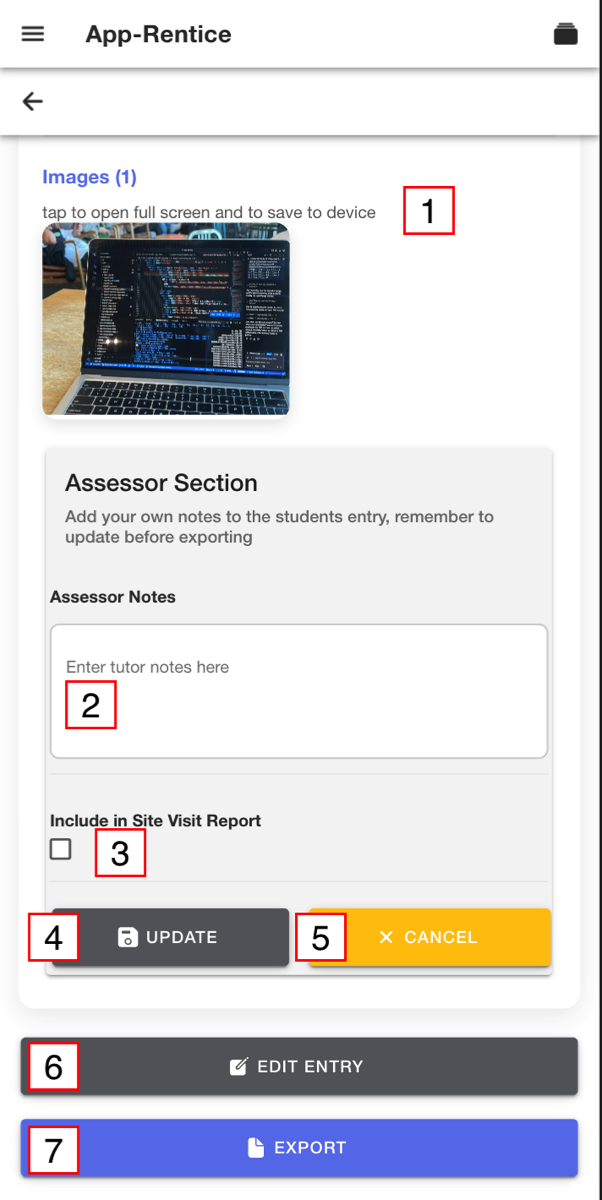
View Activity
Tap an entry to open it
All the entry information and saved images are displayed on this page
Tap an entry to open it
All the entry information and saved images are displayed on this page
- Entry information is displayed as view only, scroll down to the assessor section, Tapping on the image will open it allowing you to download it
- Assessor Notes - Add your notes
- Include in Site Visit Report - this will update the entries status to assessor checked
- Update - saves your notes and status update
- Cancel - Returns to list (recommend you use update so the status is updated)
- Edit Entry - full edit functions of the students entry
- Export PDF create a PDF of that entry
3.4
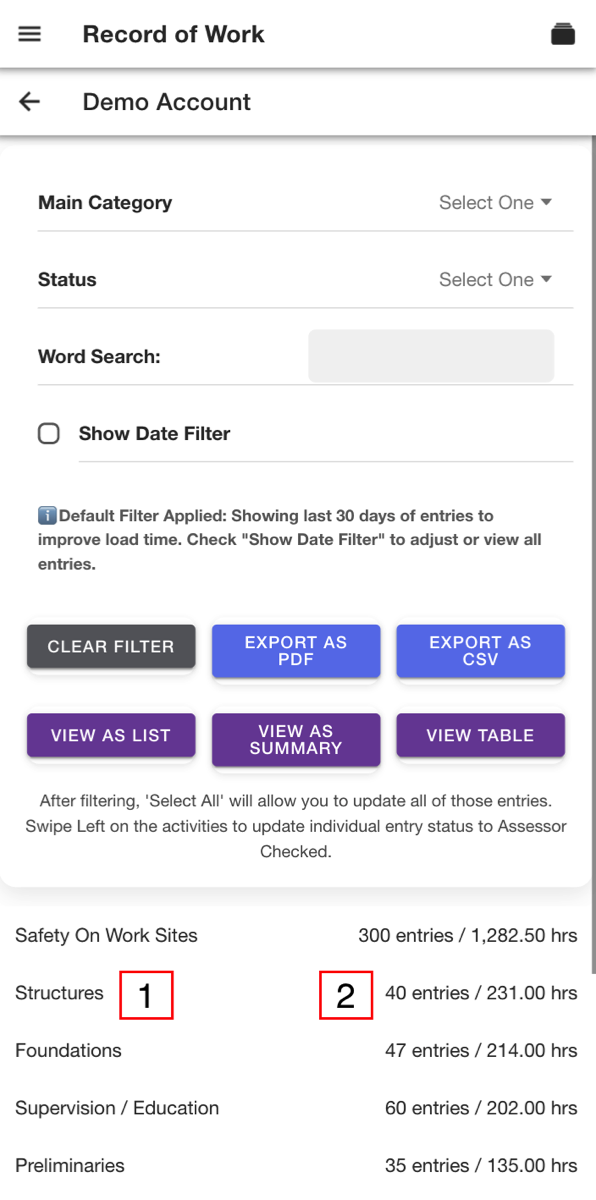
Summary View
After selecting View as Summary
You can view and select the students entries via the summary pages through to the Activity Detail Page
After selecting View as Summary
- Category - select the main to view the Subcategories an then Activities
- Total Entries made for the categories and total Hours completed for that category
You can view and select the students entries via the summary pages through to the Activity Detail Page
3.5
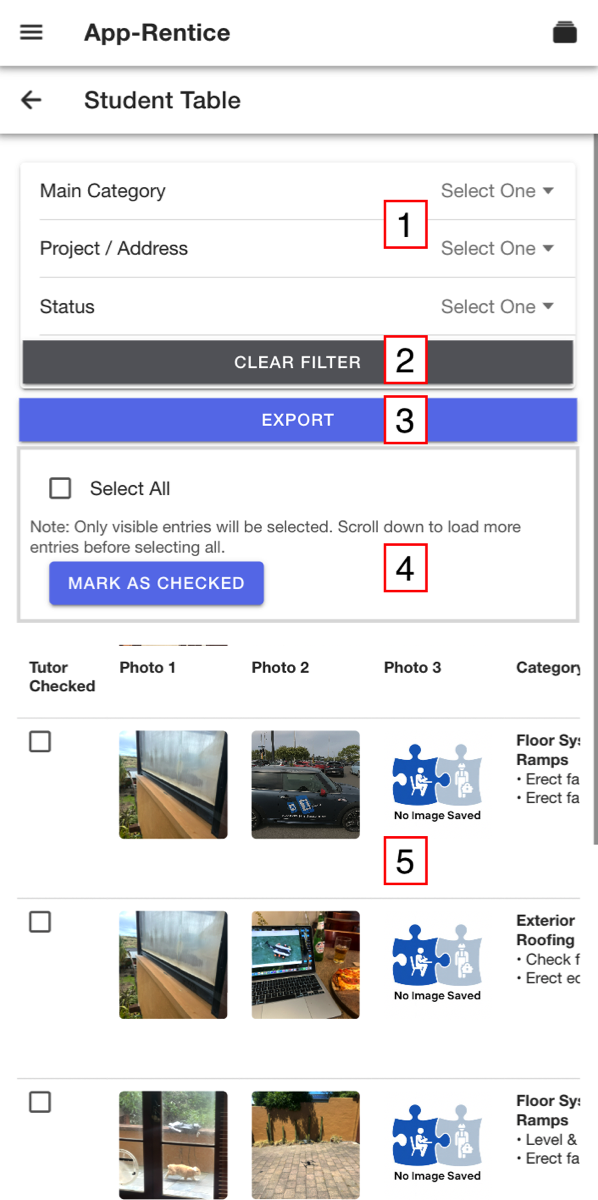
Table View
After selecting Table View
Selecting an entry will open it
After selecting Table View
- Filter options just like List View
- Clear Filter
- Export PDF - create a pdf with a landscape layout
- Select All and Mark As Complete just like List View
- Entry List - scroll down to view entries, scroll right to few entry details
Selecting an entry will open it
Employer Quick Start
1.0
Access the App
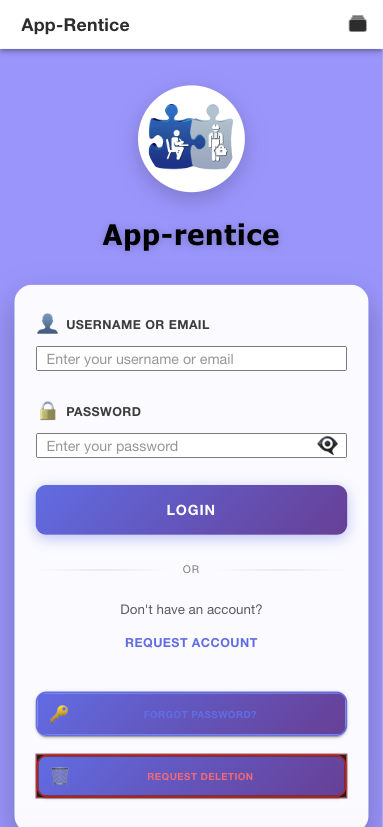
It is recommended your try the app with the temp password given to you by your provider, then use the ‘Forgot Password’ function to set your own password.
- Search ‘App-Rentice’ in the app stores or
- Download the iOS app at https://itunes.apple.com/nz/app/app-rentice/id1234156125?mt=8
- Download the Android app at https://play.google.com/store/apps/details?id=com.artisanideas.apprentice&hl=en
- You can access the web app at https://app-rentice.firebaseapp.com
- To sign in Use your email or username and password
It is recommended your try the app with the temp password given to you by your provider, then use the ‘Forgot Password’ function to set your own password.
2.0
Employer Menu
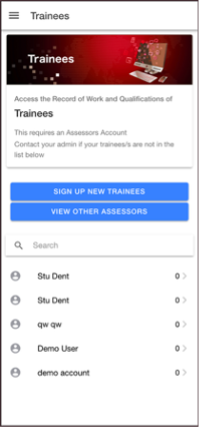
- The Employer Menu should open by default the you are logged in as an Employer,
- Otherwise open the Side Menu and select it
2.1
Employer Menu
- Add a Staff Member
- List of Staff / Students assigned to you
2.2
View Student / Trainee Menu
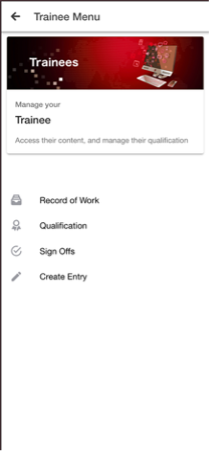
Select a Staff / Student to view their content
Select a Staff / Student to view their content
- Record of Work
- Qualifications - See Qualifications Section
- Sign Offs / Site Visits - See Site Visits Sections
Add a Staff / Student
3.0

Employer Code
This will show your employer code, provide this to your employee so they can enter it into their account info
This will show your employer code, provide this to your employee so they can enter it into their account info
3.1
Student Account Info Update
Have your Student or their Tutor / Assessor update their/the student account info by selecting Account info from the Side Menu and complete the following:
Have your Student or their Tutor / Assessor update their/the student account info by selecting Account info from the Side Menu and complete the following:
- Select Update Account
- Enter your Employer Code
- Select Save
4.3
Display and Export Options
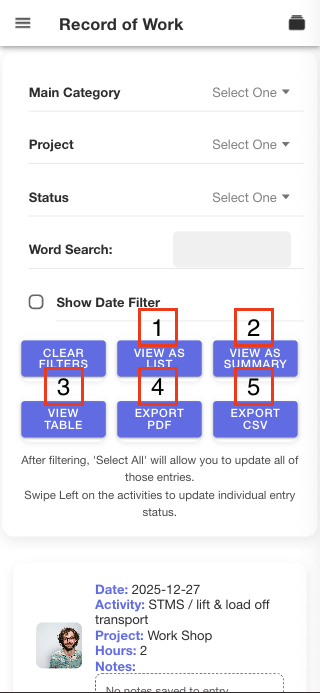
- Default view is the View as List
- View as Summary views show the categories with total hours completed, selecting a category will open the sub categories and the activities.
- View Table show the entries with the details in a row
- Export PDF creates a PDF of the table view using the filters and the displayed entries.
- Export CSV creates a CSV file with all or the filter entries
4.4
Entries List
Select an Entry to Open it
All the entry information and saved images are displayed on this page.
Select an Entry to Open it
All the entry information and saved images are displayed on this page.
- Add your Tutor Notes, specific to this entry, general site visit notes are made in the Site Visit page.
- Check Tutor Checked to update the entry status
- Export PDF create a PDF of that entry
- Edit Entry opens the entry allowing you to edit the details, see Making an Entry for info
- Delete Entry, you'll be prompted to confirm
- Tapping on the image will open it allowing you to download it
- The Back Arrow will take you back to the previous page
View a Staff / Students Entries
3.0
Record of Work
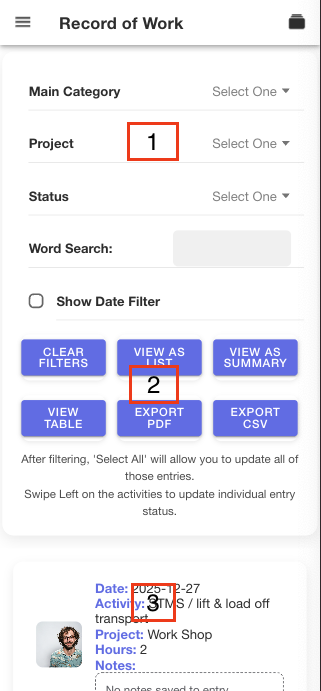
The Record of Work displays all completed entries with the ability to filter the list and change the way you view them.
The Record of Work displays all completed entries with the ability to filter the list and change the way you view them.
- Filter the Categories
- Different Views and Exports
- Entries List
3.1
Filter Options
Making a selection will automatically update the list.
Select the Clear Filters button to reset the filter
Making a selection will automatically update the list.
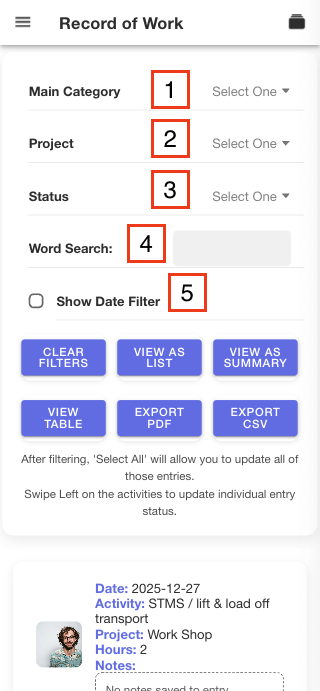
- Selecting a Main Category will then display the dropdown for its subcategories, Selecting a Sub Category will then display its Activities.
- Selecting Project will show all entries for that project
- Selecting a Status from the dropdown will filter the list by status
- You can filter the list by entering specific text in the Word Search
- Selecting the Show Date Filter Checkbox displays the from and to dates
Select the Clear Filters button to reset the filter
4.3
Display and Export Options
- Default view is the View as List
- View as Summary views show the categories with total hours completed, selecting a category will open the sub categories and the activities.
- View Table show the entries with the details in a row
- Export PDF creates a PDF of the table view using the filters and the displayed entries.
- Export CSV creates a CSV file with all or the filter entries
4.4
Entries List
Select an Entry to Open it
All the entry information and saved images are displayed on this page.
Select an Entry to Open it
All the entry information and saved images are displayed on this page.
- Add your Tutor Notes, specific to this entry, general site visit notes are made in the Site Visit page.
- Check Tutor Checked to update the entry status
- Export PDF create a PDF of that entry
- Edit Entry opens the entry allowing you to edit the details, see Making an Entry for info
- Delete Entry, you'll be prompted to confirm
- Tapping on the image will open it allowing you to download it
- The Back Arrow will take you back to the previous page