


Enter Activities
1.0
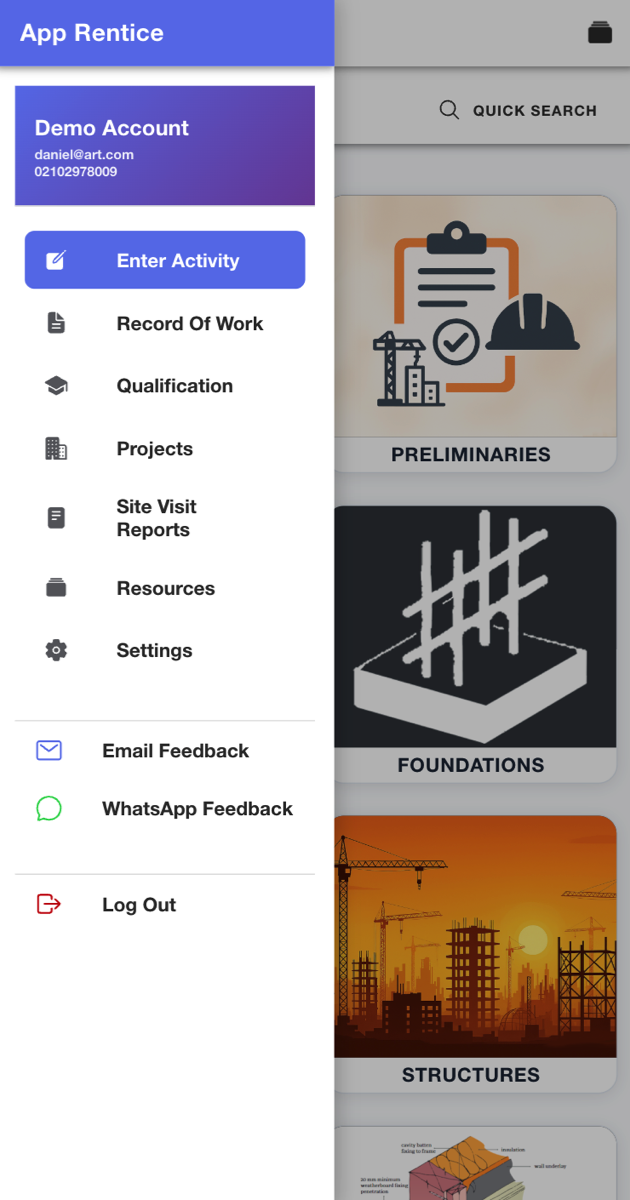
Enter Activity
Select ‘Enter Activity’ from the side menu
Select ‘Enter Activity’ from the side menu
1.1
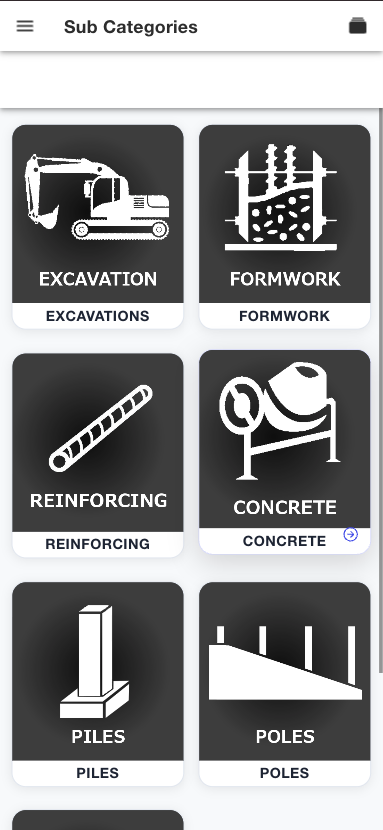
- Select your main category from the list or menu
- Swipe up and down to scroll
- Select your sub category from the list of menu
Depending on your provider, the Category pages will be displayed as either a list or a menu screen with image icons
1.2
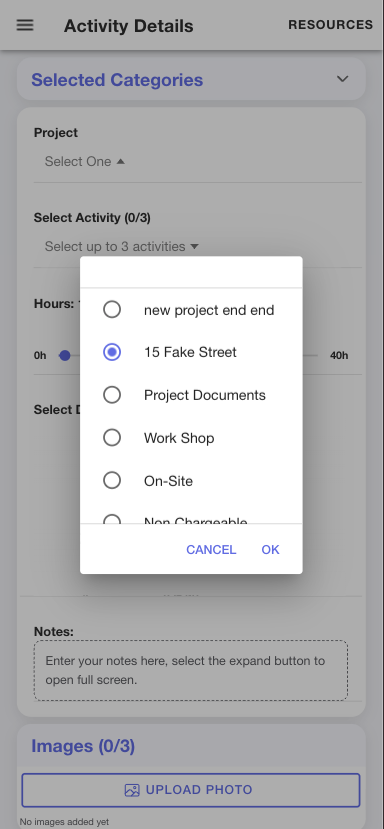
Select a Project
If you forgot to add your project, just select one of the defaults and continue, see 2.0 to add your Project and Edit the entry to add it.
- Select the Project Dropdown
- Select your project
- Swipe up and down to scroll
- Select ‘OK’
If you forgot to add your project, just select one of the defaults and continue, see 2.0 to add your Project and Edit the entry to add it.
1.3
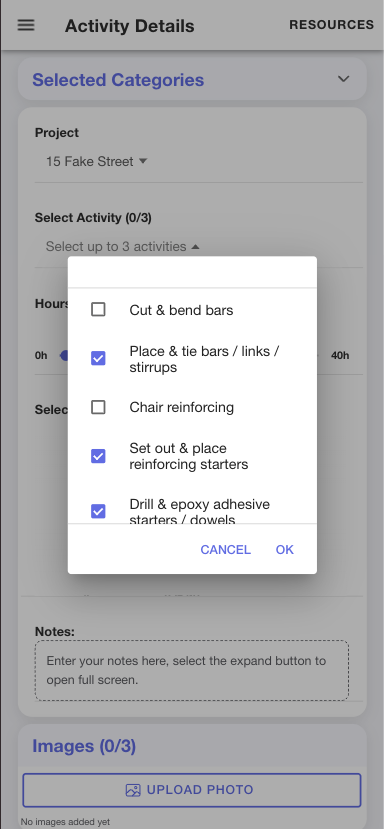
Select your Activities
App-Rentice uses a three level Work Breakdown Structure (WBS), if your course only has two levels an ‘Activity Completed’ placeholder will be used.
You must select this in order to save your entry
- Select the ‘Select Activity’ Dropdown - Max 3
- Select the tick box
- Select ‘OK’
App-Rentice uses a three level Work Breakdown Structure (WBS), if your course only has two levels an ‘Activity Completed’ placeholder will be used.
You must select this in order to save your entry
1.4
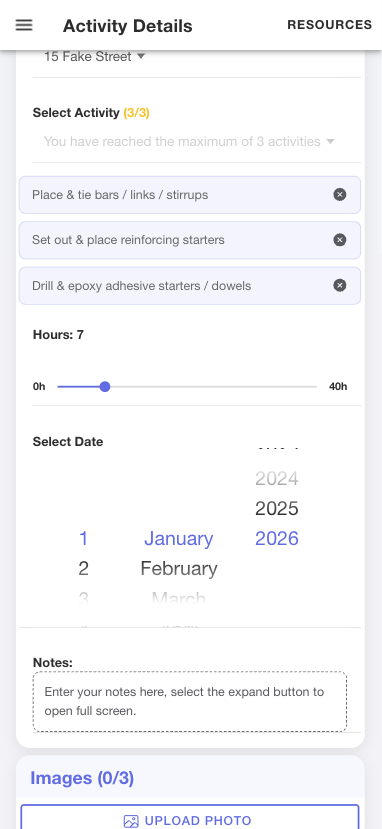
Add Hours and the Date
App-Rentice has a limit of 40 hours per entry as it’s designed to create individual entries for each activity, or group of similar activities so they can be easily searched later.
There’s a save and enter another feature to help quickly enter many activities.
- Use the slider to select how many hours
- Select the date to change, it will be today’s date by default.
- Select ‘Cancel’ to close the date selector or ‘Done’ to choose the new date and close.
App-Rentice has a limit of 40 hours per entry as it’s designed to create individual entries for each activity, or group of similar activities so they can be easily searched later.
There’s a save and enter another feature to help quickly enter many activities.
1.5
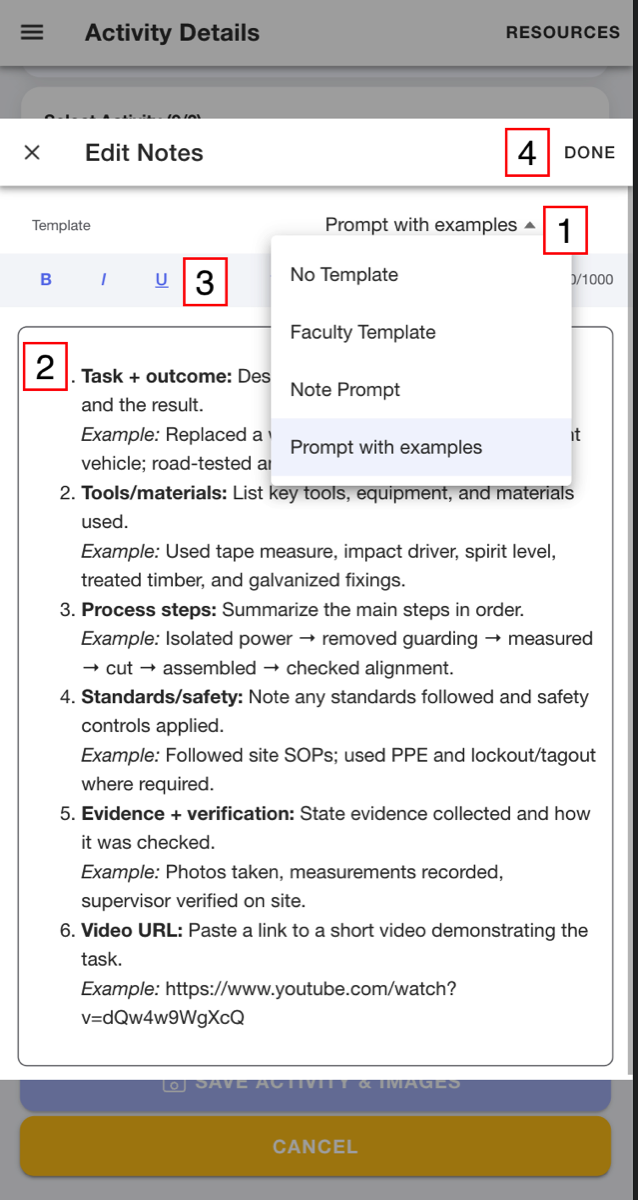
Notes (Optional)
Select the Notes box to open the full screen modal
Select the Notes box to open the full screen modal
- Templated Text is available, there's an App-Rentice Default, Default with Examples and a Template created by your Training Provider
- Text box allows up to 1000 characters
- Text Rich Options
- Select Done to close
1.6
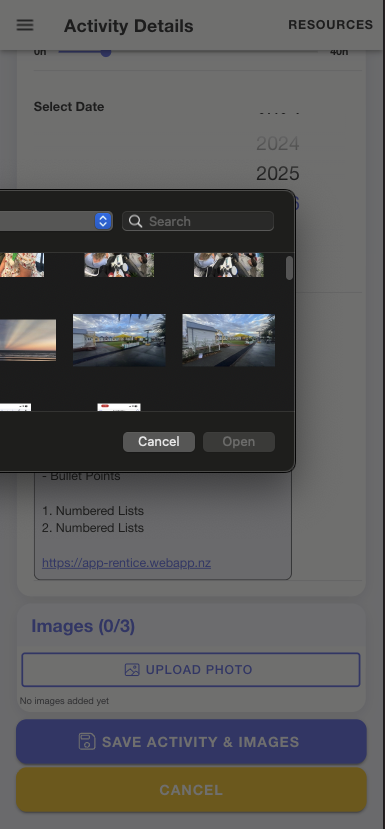
Add Photos
- Select Upload Photo
- Select the devices camera or photo folder from the pop up
- Take or select your photo
- Repeat to add more photos - Max 3
1.7
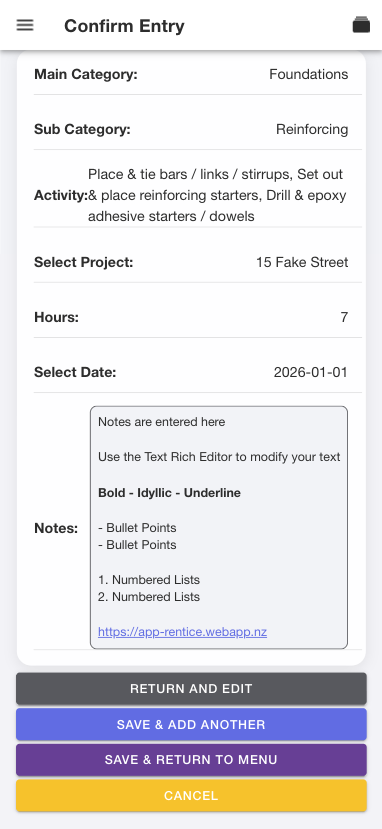
Save / Confirm / Edit / Enter Another
Select Save Activity and Images
The Confirm Entry will allow you to check your entry details again, as well as give you the option to make another entry with similar details
By selecting ‘Save & Enter Another’ the entry will be saved and then an ‘Another Entry’ Screen will open with the same details, allowing you quickly make another entry by changing any details if needed and/or taking more photo’s, then selecting save.
Selecting ‘Save and Return to Menu’ will save the entry and take you back to the start menu.
Select Save Activity and Images
The Confirm Entry will allow you to check your entry details again, as well as give you the option to make another entry with similar details
By selecting ‘Save & Enter Another’ the entry will be saved and then an ‘Another Entry’ Screen will open with the same details, allowing you quickly make another entry by changing any details if needed and/or taking more photo’s, then selecting save.
Selecting ‘Save and Return to Menu’ will save the entry and take you back to the start menu.
Student Log
2.0
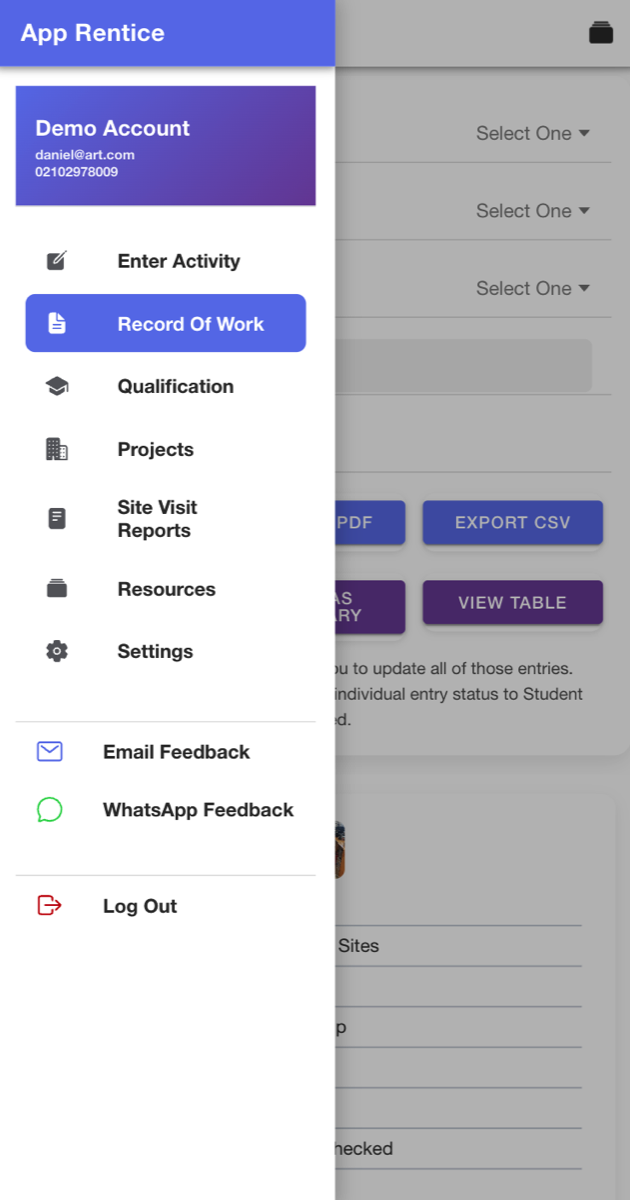
Record of Work
Select ‘Record of Work’ from the side menu
Select ‘Record of Work’ from the side menu
2.1
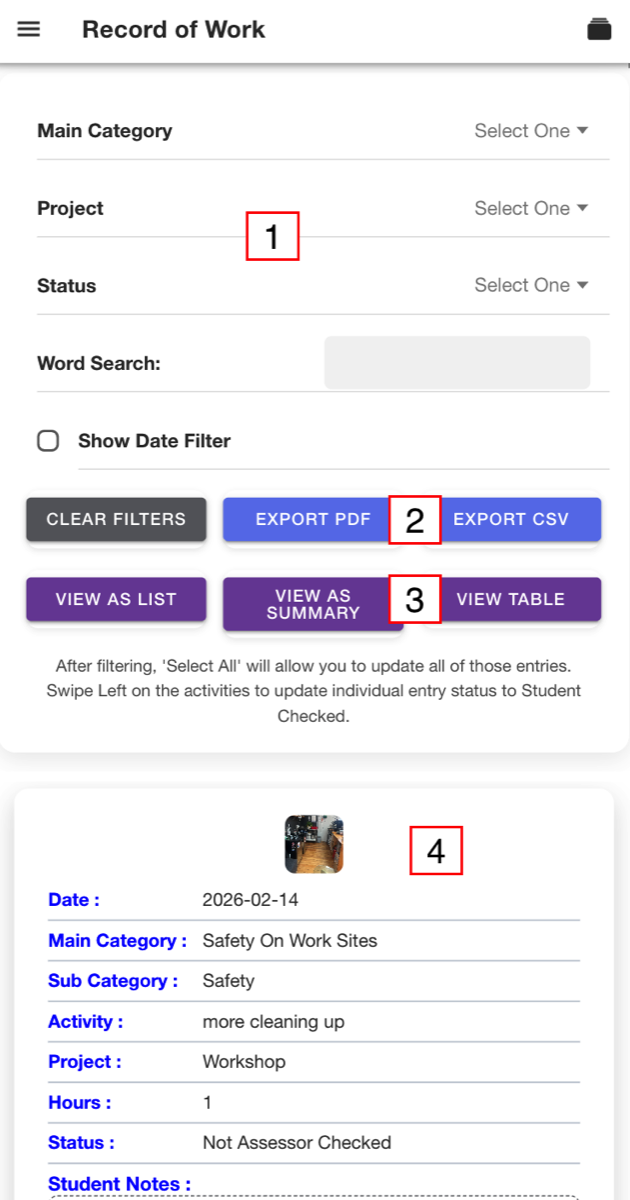
Record of Work
The Record of Work displays all completed entries with the ability to filter the list and change the way you view them.
The Record of Work displays all completed entries with the ability to filter the list and change the way you view them.
- Filter the Categories
- Export for PDF or CSV
- View as List, Summary or Table
- Entries List
2.2
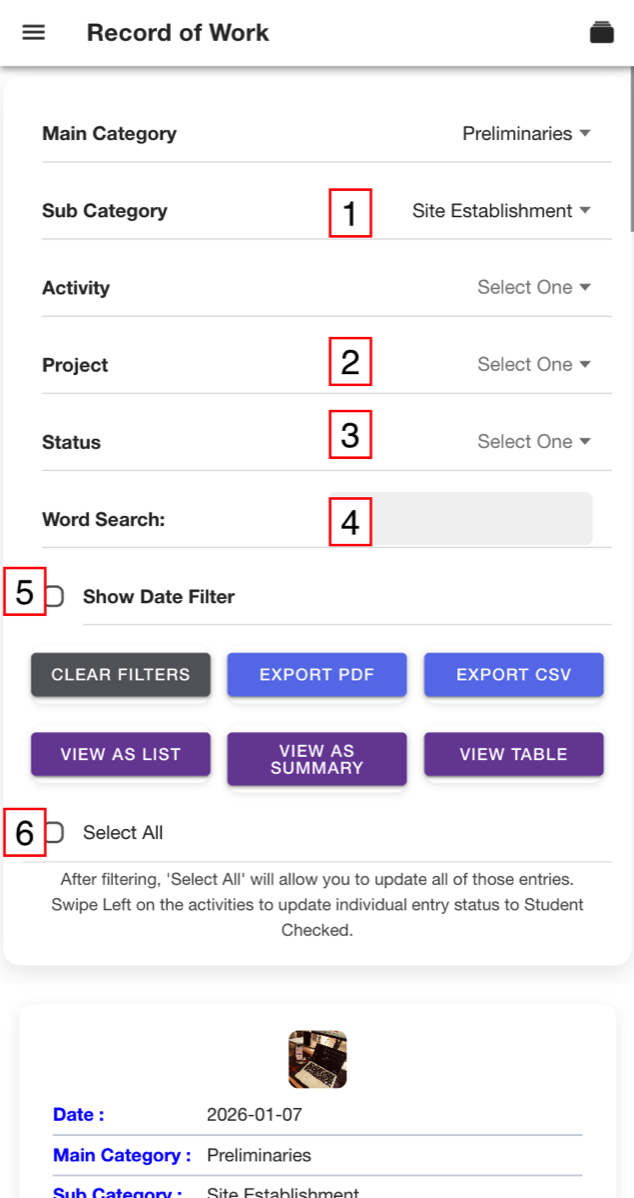
Filter Options
Making a selection will automatically update the list.
Select the Clear Filters button to reset the filter
Making a selection will automatically update the list.
- Selecting a Main Category will then display the dropdown for its subcategories, Selecting a Sub Category will then display its Activities.
- Filter by Project
- Selecting a Status from the dropdown will filter the list by status
- You can filter the list by entering specific text in the Word Search
- Selecting the Show Date Filter Checkbox displays the from and to dates
- When the entries are filtered you are able to Select All to, update those entries statuses to 'Student Checked'
Select the Clear Filters button to reset the filter
2.3
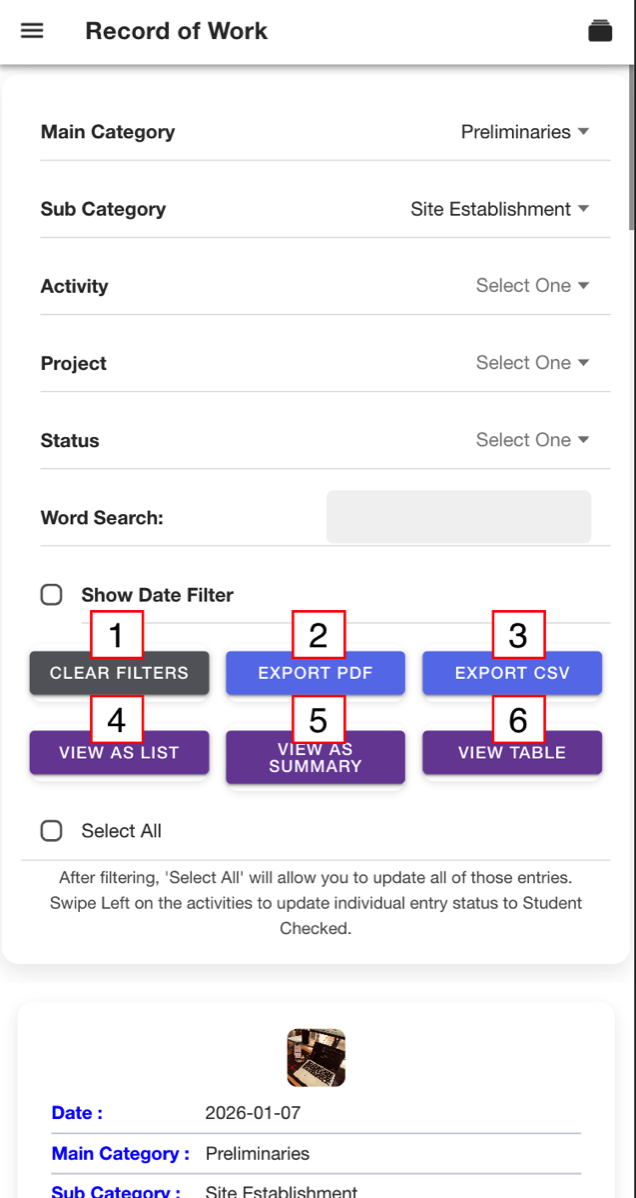
Display and Export Options
You can use the filter and then swap between list and summary views
PDF Export will not 'print all' you will need to scroll down the list to include them in the PDF
- Clear Filter resets the list
- Export PDF creates a PDF of the table view using the filters and the displayed entries.
- Export CSV creates a CSV file with all or the filter entries
- Default view is the View as List
- View as Summary views show the categories with total hours completed, selecting a category will open the sub categories and the activities.
- View Table show the entries with the details in a row
You can use the filter and then swap between list and summary views
PDF Export will not 'print all' you will need to scroll down the list to include them in the PDF
2.4
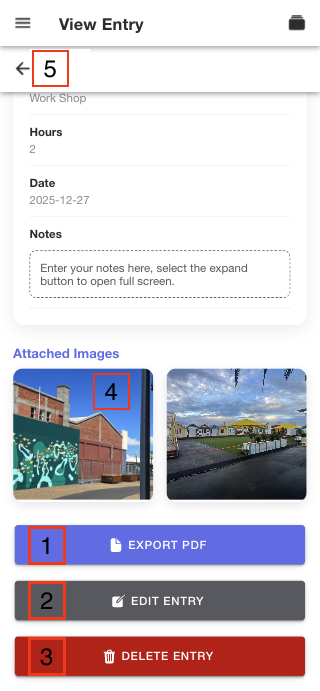
View Entry
Tap an entry to open it
All the entry information and saved images are displayed on this page, including if the Tutor/Assessor has made any notes
Tap an entry to open it
All the entry information and saved images are displayed on this page, including if the Tutor/Assessor has made any notes
- Export PDF create a PDF of that entry
- Edit Entry opens the entry allowing you to edit the details, see Making an Entry for info
- Delete Entry, you'll be prompted to confirm
- Tapping on the image will open it allowing you to download it
- The Back Arrow will take you back to the previous page
2.5
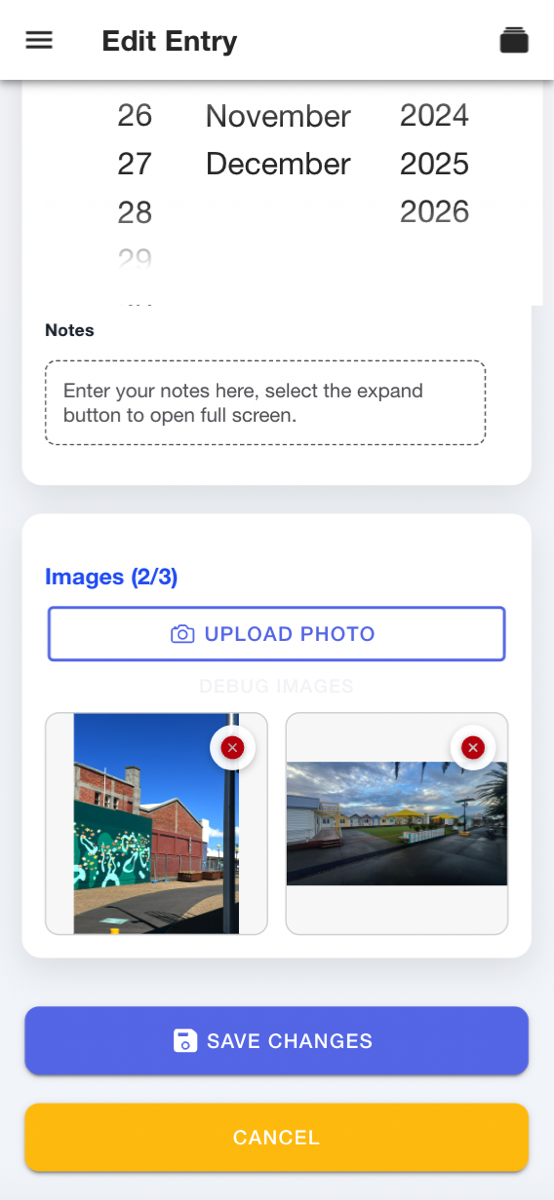
Edit Entry
After selecting Edit Entry
After selecting Edit Entry
- Edit Main/Sub/Activity, Project, Hours, Date and Notes as Required
- Select the x to delete a photo
- Select Upload Photo to add more photo
- Select Save Changes or Cancel
Projects
3.0
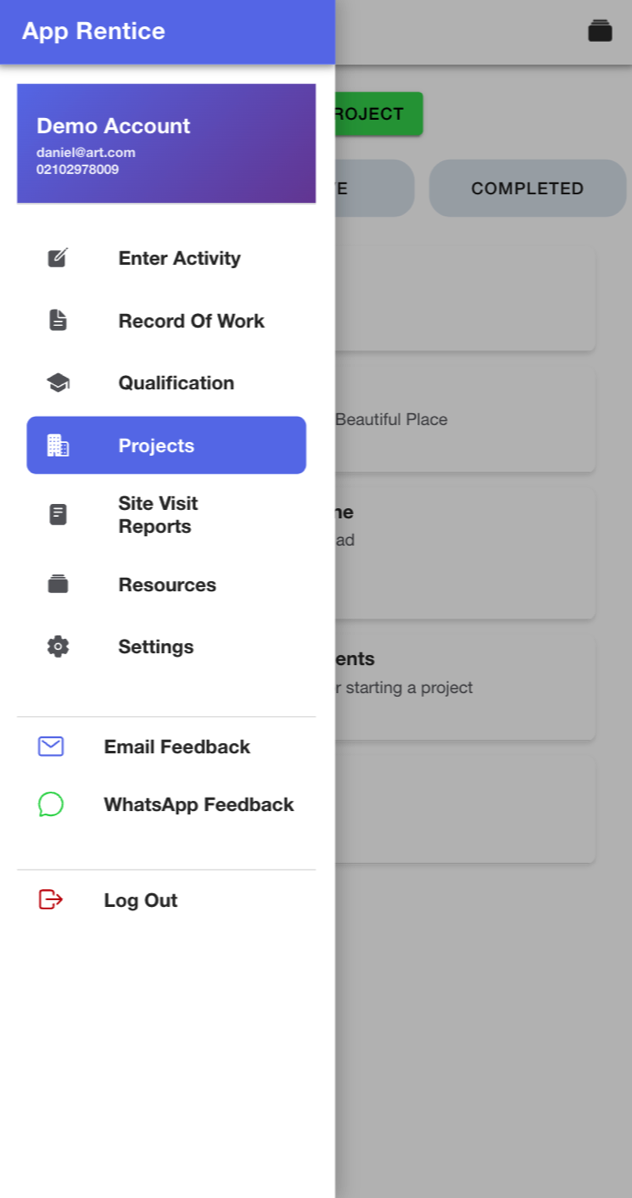
Projects
1. Select the side menu
2. Then Select Projects
1. Select the side menu
2. Then Select Projects
3.1
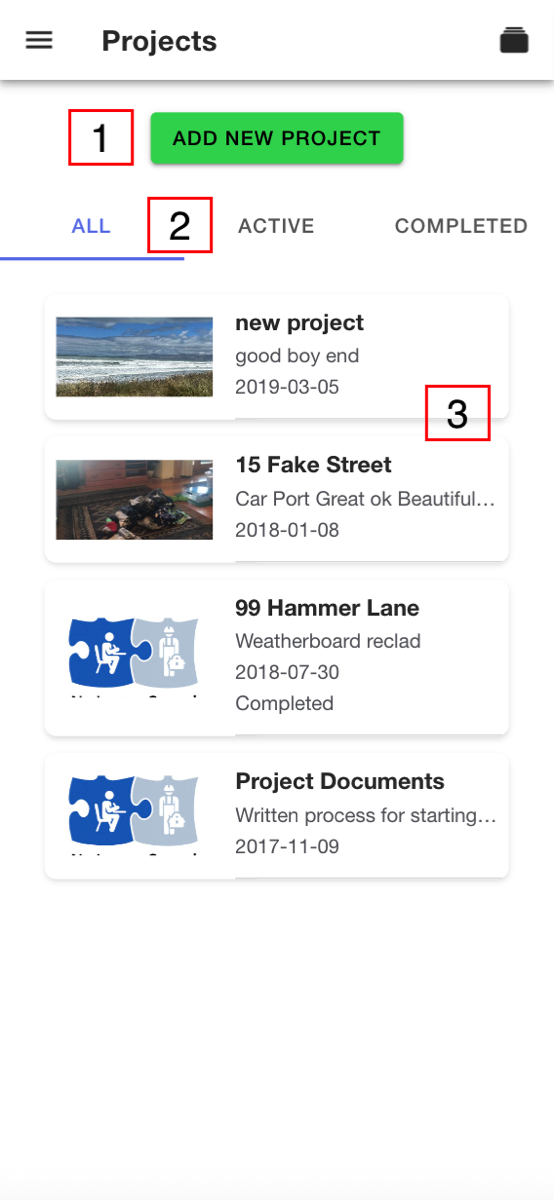
Project Menu
- Add New Project
- Project Status Filter - select to display your Active or Completed projects
- Project List - Scroll and select to open project to view and edit
3.2
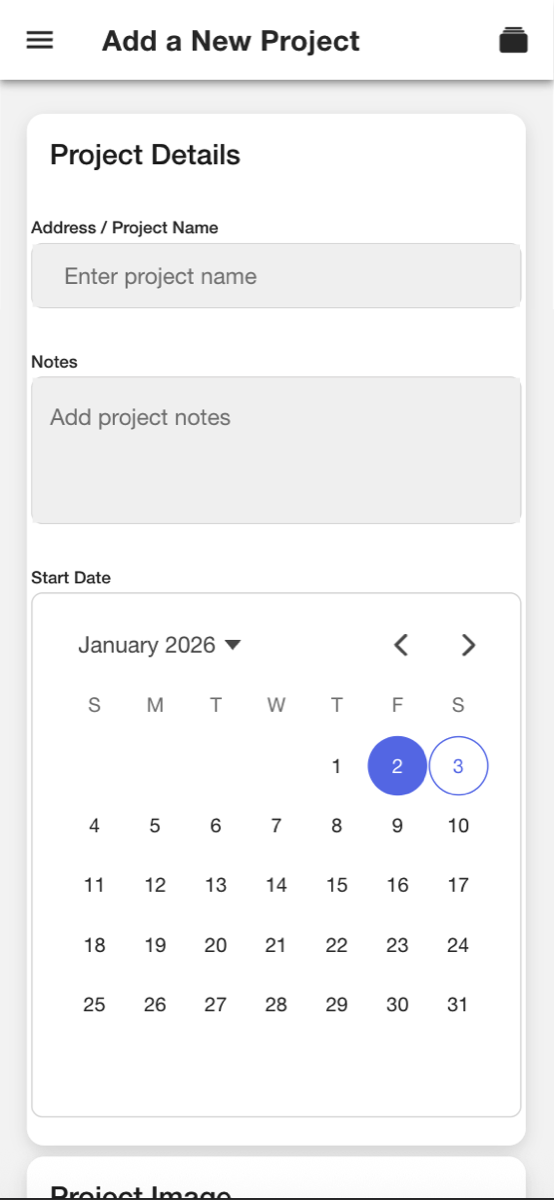
Add New Project
- Select ‘New Project’
- Enter the project name
- Add notes if needed (optional)
- Add a start date (optional)
- Add a photo from your camera or photo folder (optional)
- Select ‘Save’
3.3
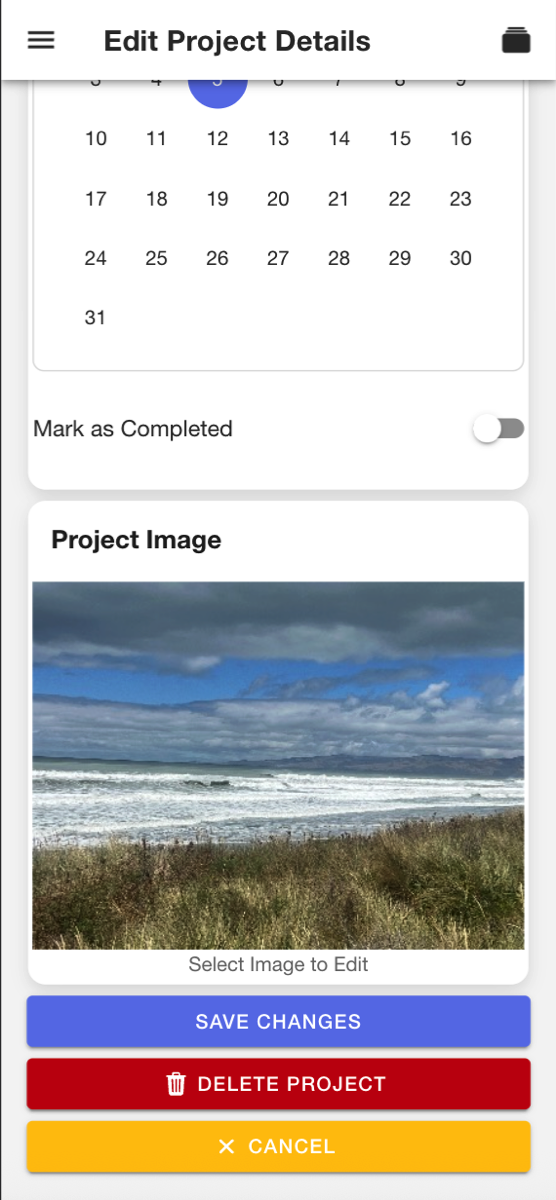
Edit Project Details
- Select the project
- Edit Project Name / Notes / Start Date as required
- Select Mark as Complete to update the project status - Completed Projects will not show in the Enter Activity page dropdown.
- Select the image to change
- Select Save
- Selecting Delete Project will have a prompt to confirm deletion
Qualifications
4.1
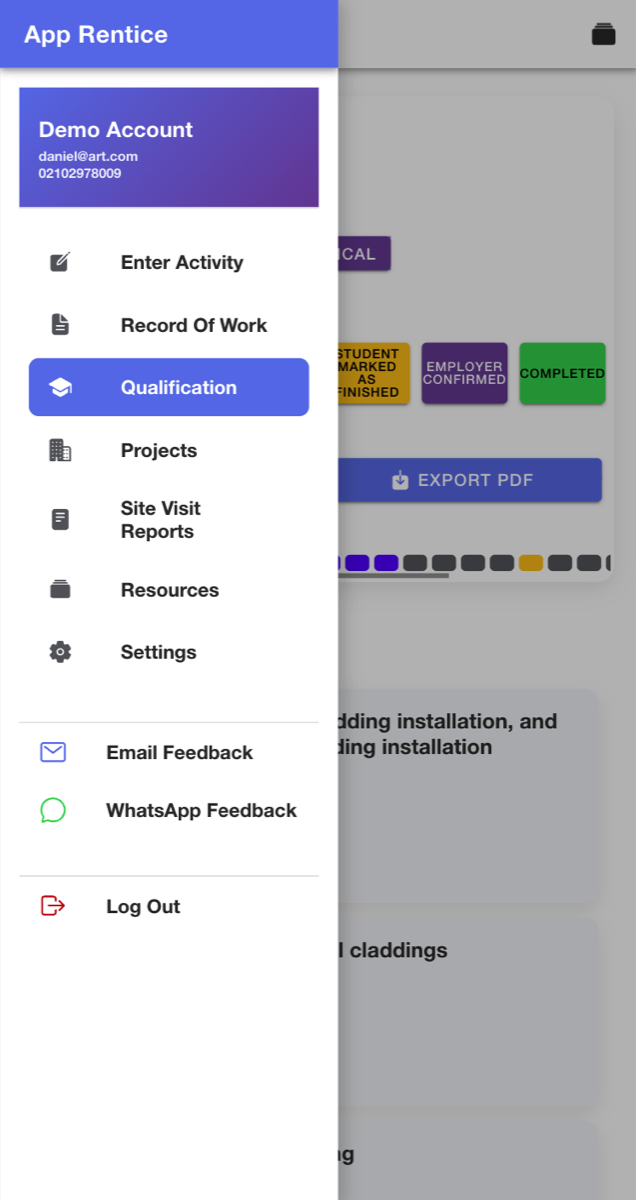
Qualifications
1. Select the side menu
2. Then Select Qualifications
1. Select the side menu
2. Then Select Qualifications
4.1
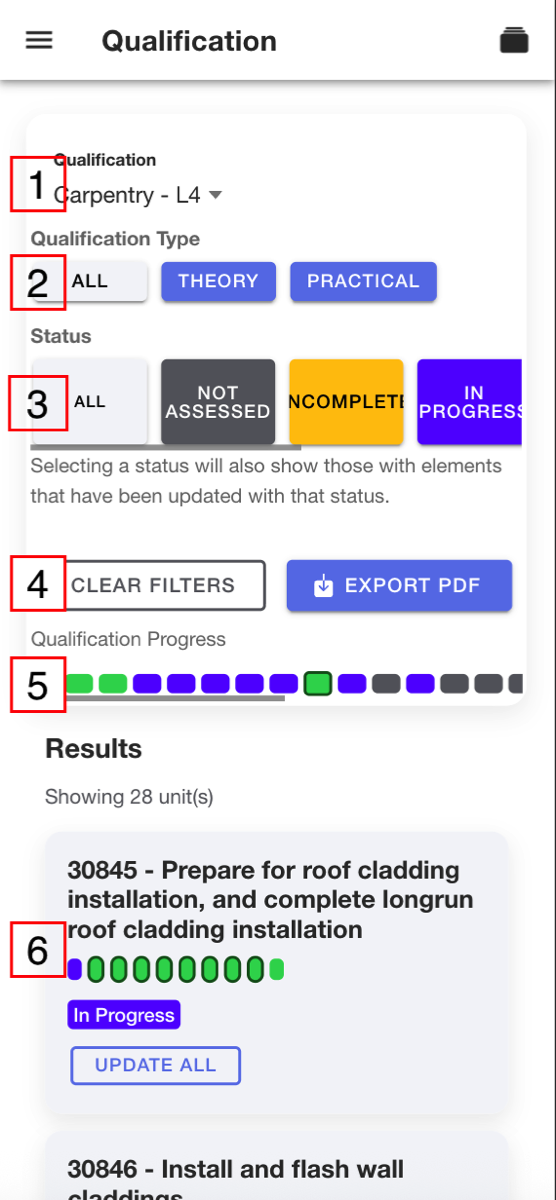
Qualifications Menu
- Qualification Name
- Select Theory or Practical to filter
- Status Filter - Swipe to see all options
- Clear Filter - Resets page / Export PDF - provides option to create a PDF with Just the Units/Competencies or to include the Elements/Learning Outcomes (LO)
- Unit/Competency Status Graph - Each is represented with the status colour giving you a quick view of your progress, Swipe to see all
- List of Units/Competencies and summary info
4.2
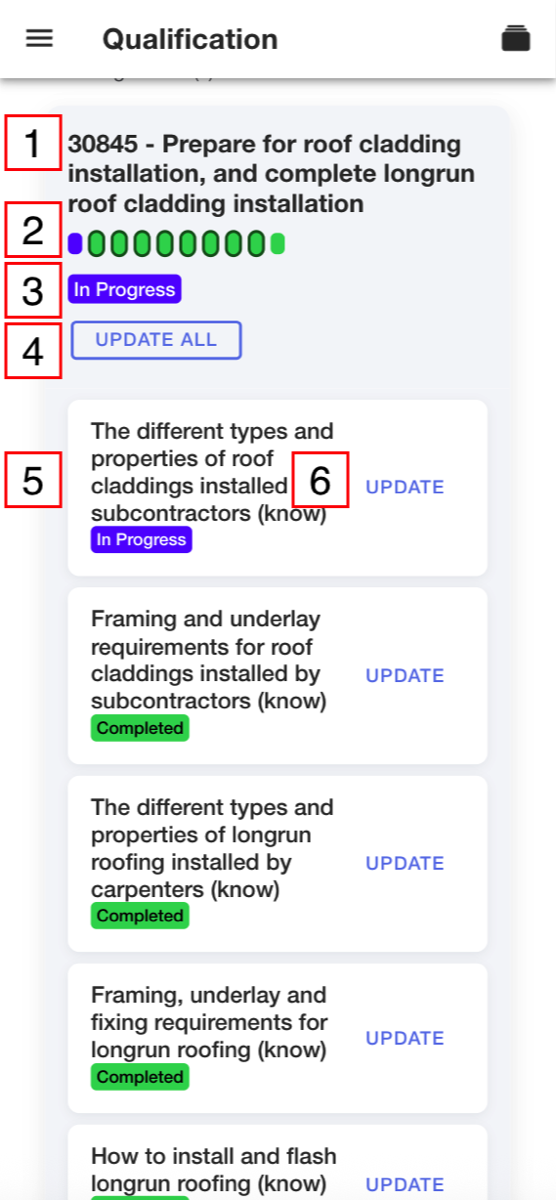
Unit / Competency Information
- Name
- Element/LO Status Graph - Each is represented with the status colour giving you a quick view of your progress for that Unit/Competency
- Unit/Competency Status
- Update All - Opens the edit page with the ability to update the status of all Elements/LO's
- List of Elements/LO's and info
- Update - Open and update the status for that Element/LO
4.3
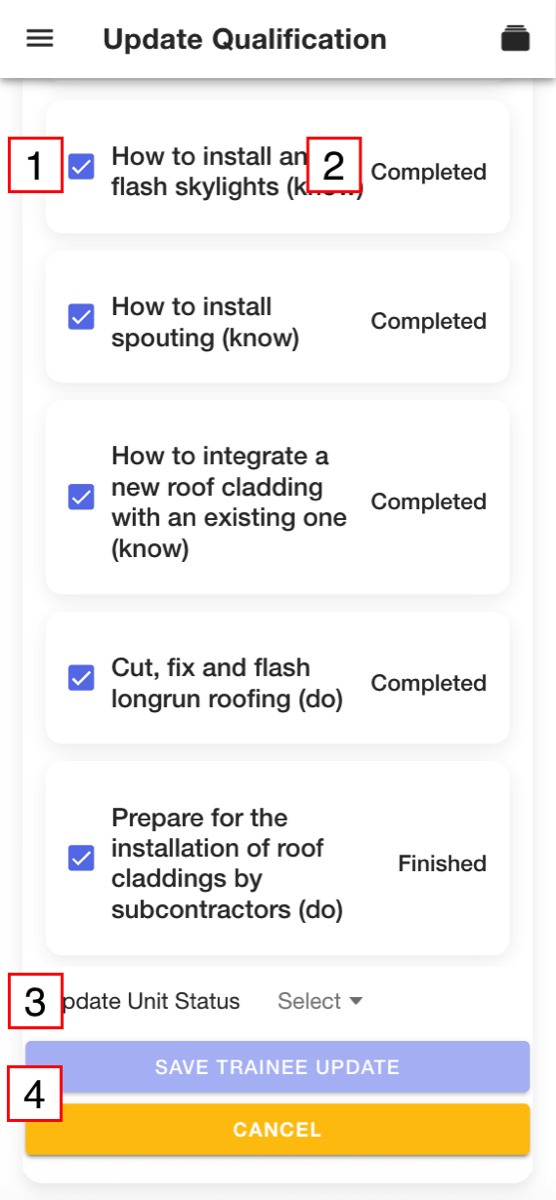
Update All Elements / Learning Outcomes (LO)
When all Elements/LO's are the same status the Unit/Competency will be updated.
Students can mark a status as finished with the Assessor marking as Complete
- Select the Checkbox to include that Element/LO in the status update
- Shows the current Status of the Element/LO
- Status Selector - Select to choose 'In Progress' or 'Finished'
- Select Save Trainee Update or Cancel
When all Elements/LO's are the same status the Unit/Competency will be updated.
Students can mark a status as finished with the Assessor marking as Complete
4.4
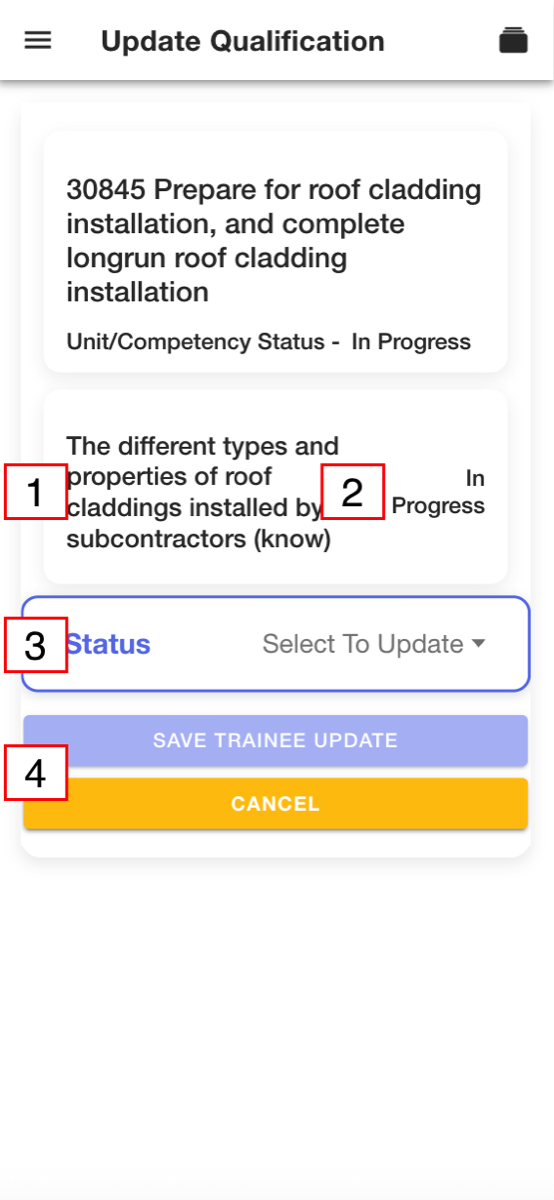
Update Single Element / Learning Outcome (LO)
Students can mark a status as finished with the Assessor marking as Complete
- Element/LO Name
- Shows the current Status of the Element/LO
- Status Selector - Select to choose 'In Progress' or 'Finished'
- Select Save Trainee Update or Cancel
Students can mark a status as finished with the Assessor marking as Complete
Site Visit Reports
5.0
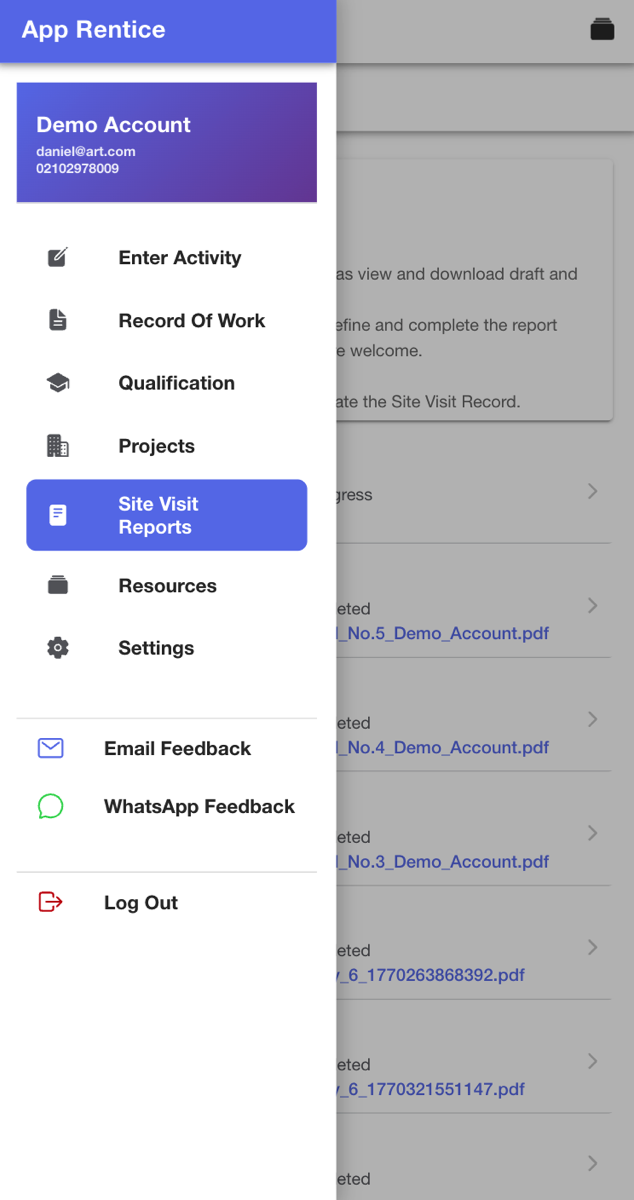
Site Visit Reports
1. Select the side menu
2. Then Select Site Visit Reports
1. Select the side menu
2. Then Select Site Visit Reports
5.1
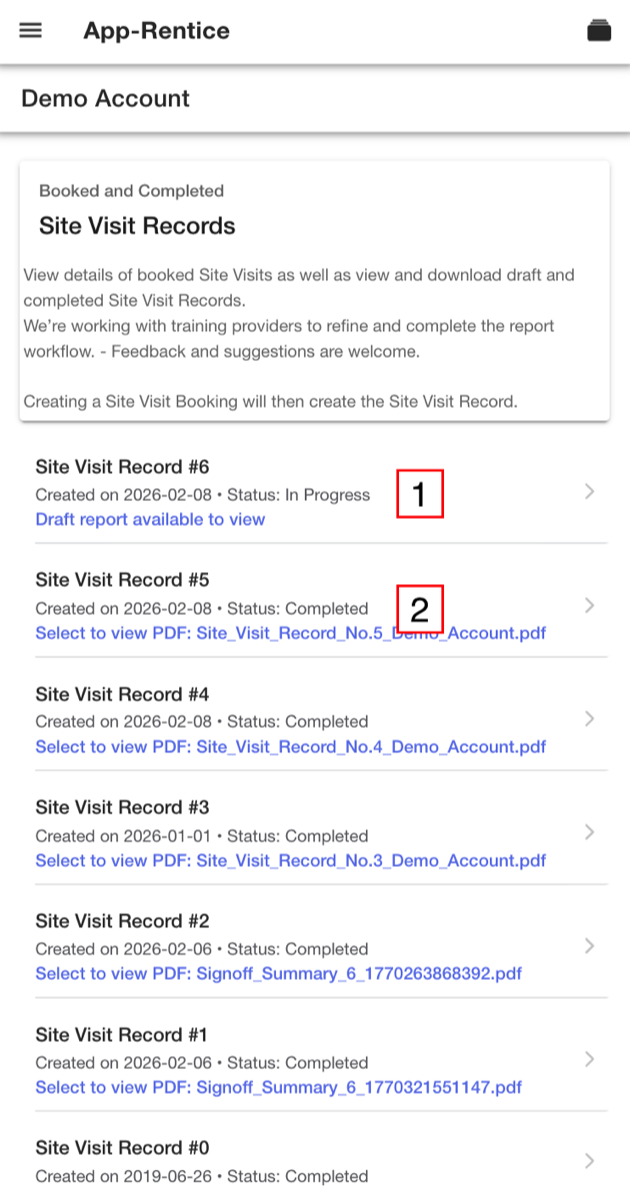
Site Visit Reports Menu
- In Progress - If your Tutor/Assessor has booked a Site Visit or is Drafting their report it will be In Progress.
- Completed - PDF's of you're completed Site Visit Reports are listed here.
5.2
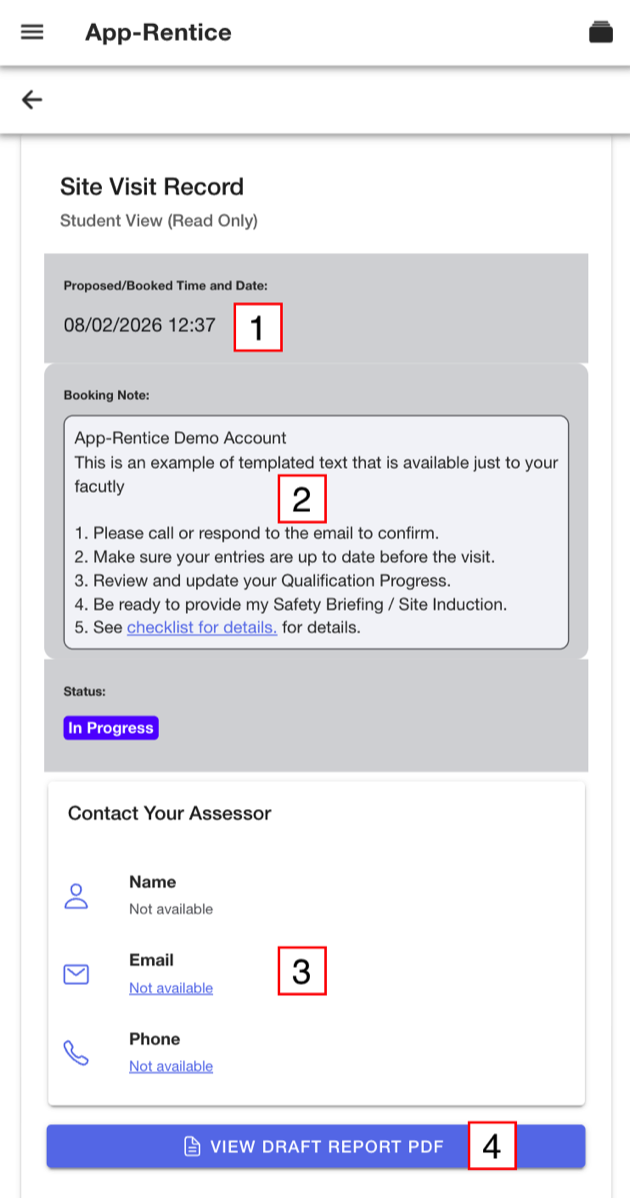
In Progress Reports
Your employer has the same view and content, once a report is completed it cannot be edited.
- Planned Date and Time (or actual when site visit has been completed
- Notes from the Assessor/Tutor about the planned Site Visit
- Tutor / Assessors contact details if you need change or confirm any details of the planned site visit
- The tutor/Assessor has the ability to create a draft PDF of the report for you to view prior to marking the Report as completed
Your employer has the same view and content, once a report is completed it cannot be edited.
Resources
6.0
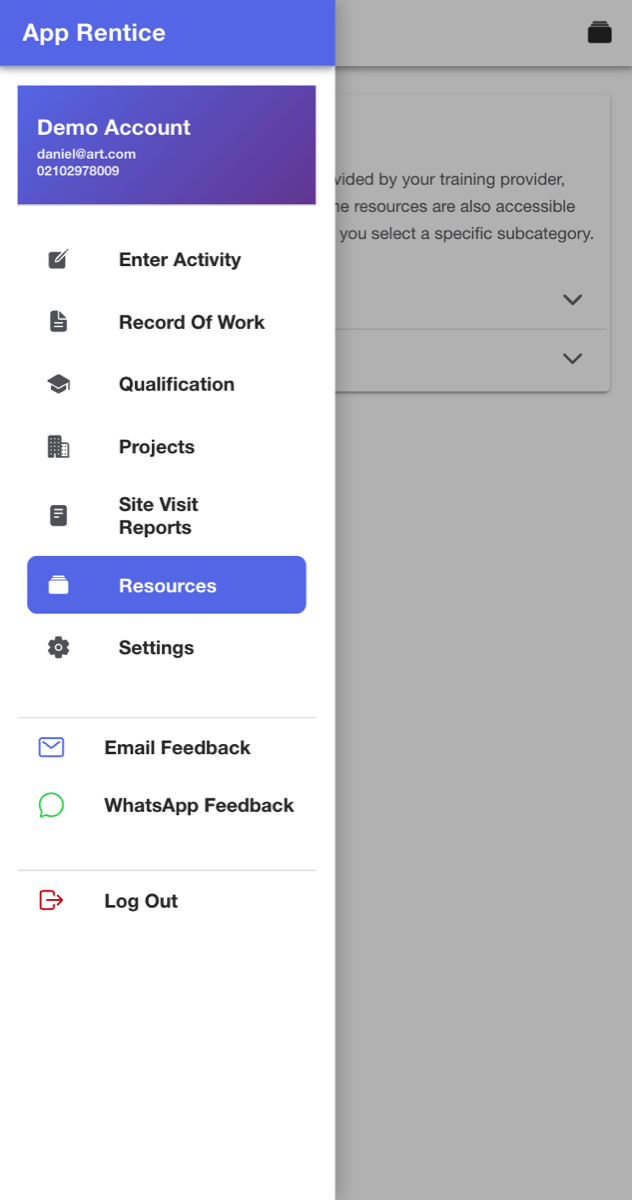
Resources
1. Select the side menu
2. Then Select Resources
1. Select the side menu
2. Then Select Resources
6.1
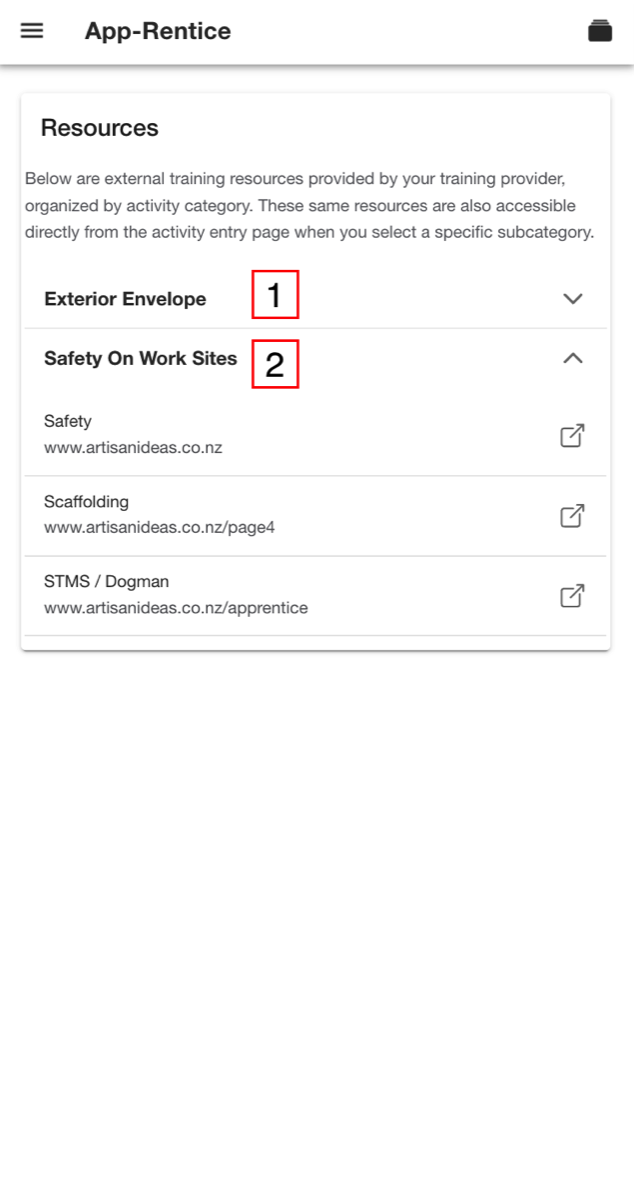
Resources Menu
Resources are created by your Training Provider and linked to the Sub-Categories of your app, these links are also available on the Enter Activity Page
- Accordion list, organised by the Main Categories
- Select a Category to open and show the URL links to the resources
Resources are created by your Training Provider and linked to the Sub-Categories of your app, these links are also available on the Enter Activity Page
Settings
7.0
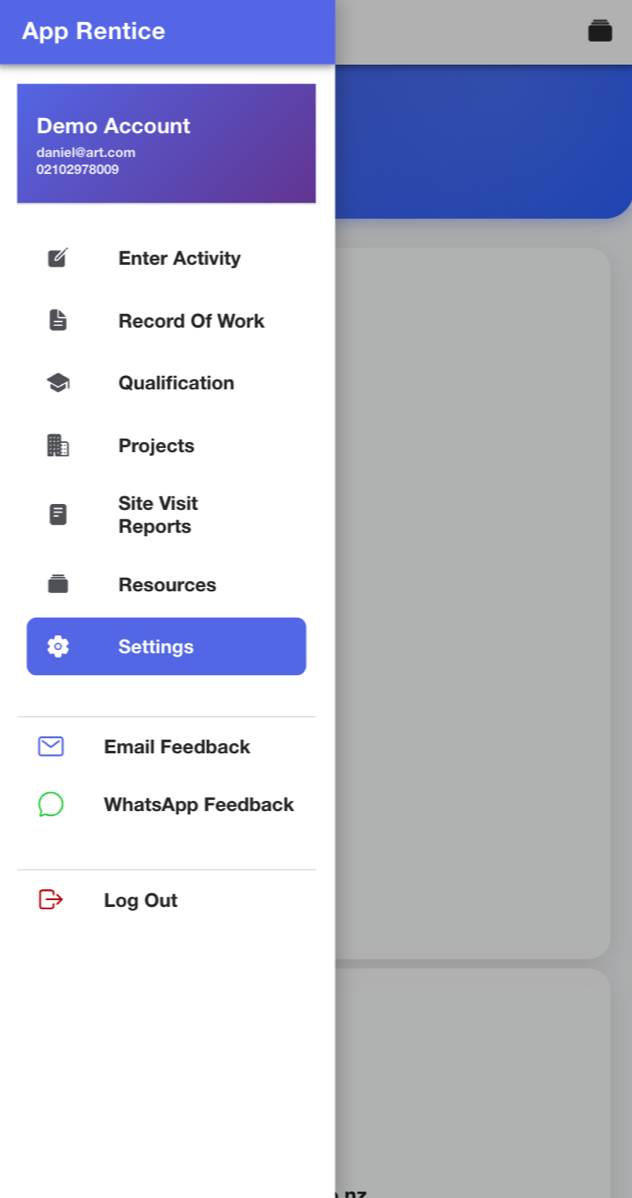
Settings
1. Select the side menu
2. Then Select Settings
1. Select the side menu
2. Then Select Settings
7.1
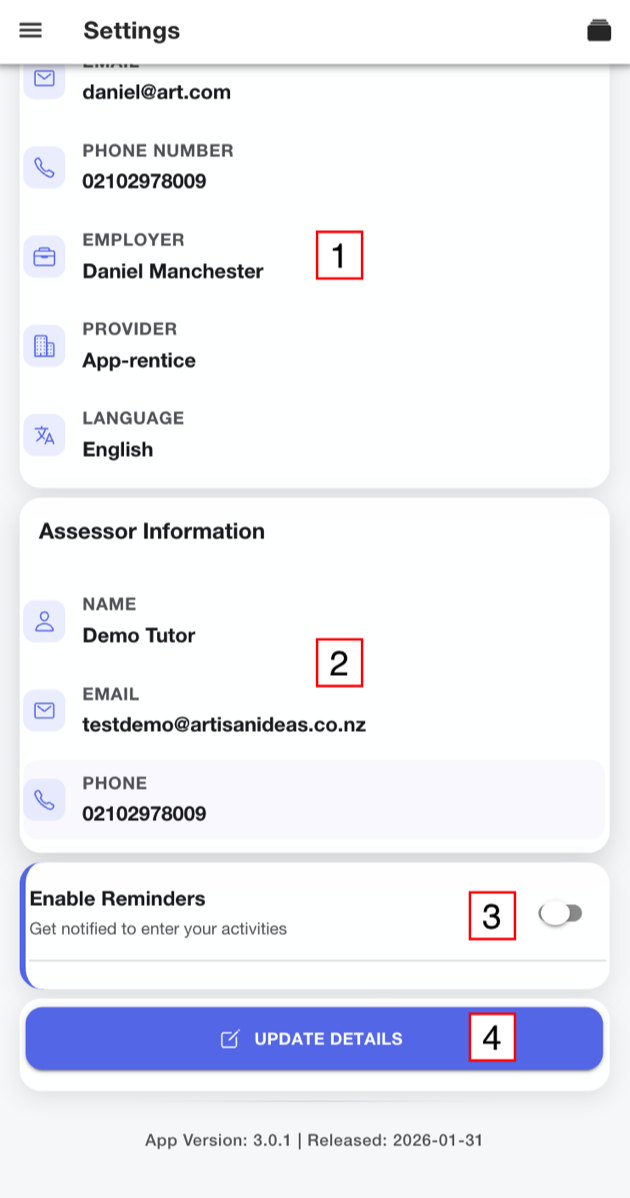
Resources Menu
- Your Account Details
- Your Tutor/Assessor contact details
- Enable Reminders (limited)
- Update Details - select to update your info
7.2
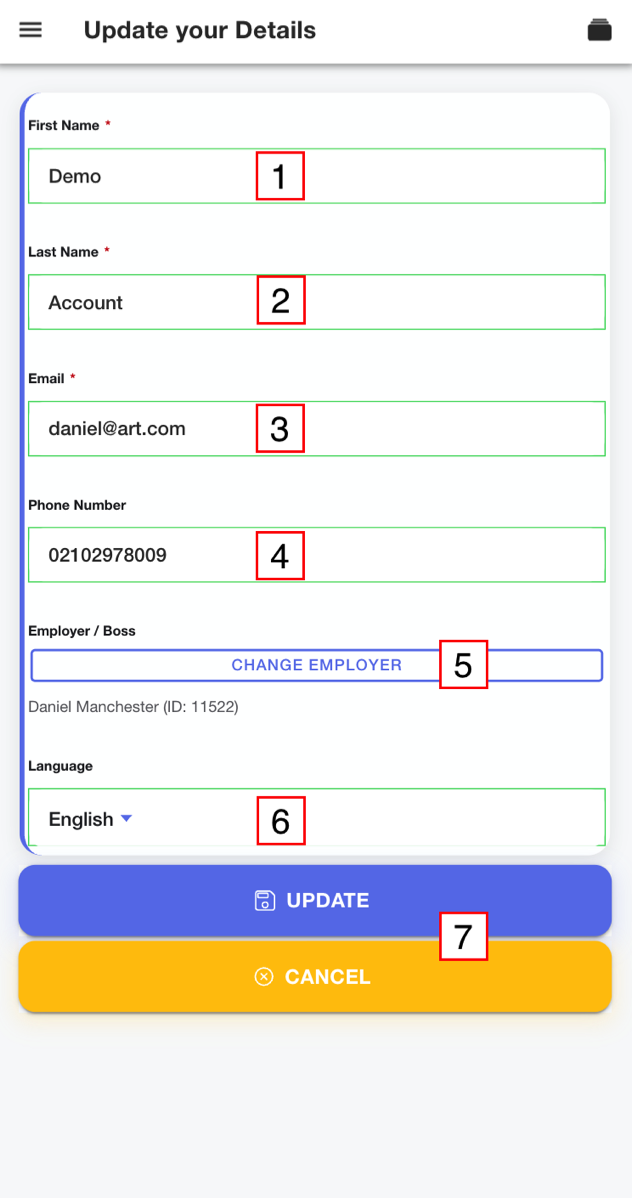
Resources Menu
- Change your First Name
- Change your Last Name
- Update your Email
- Add/Update your Phone
- Select Change Employer and a pop list of every employer with your Training Provider will be displayed, you can word search to find them
- Other Languages will be available soon.
- Update to save or Cancel to return to the setting page.